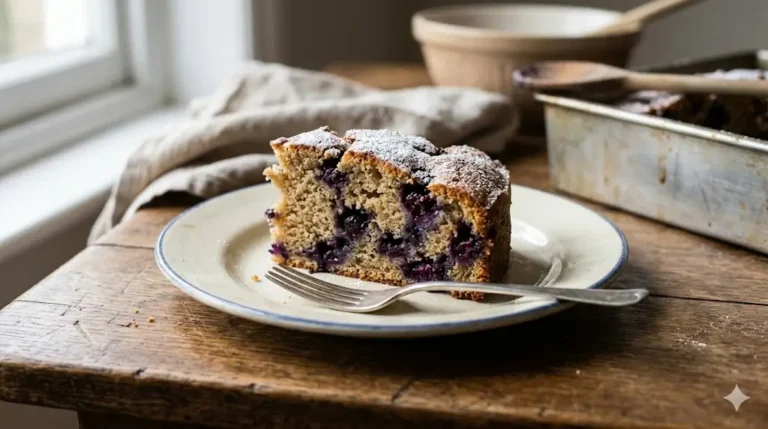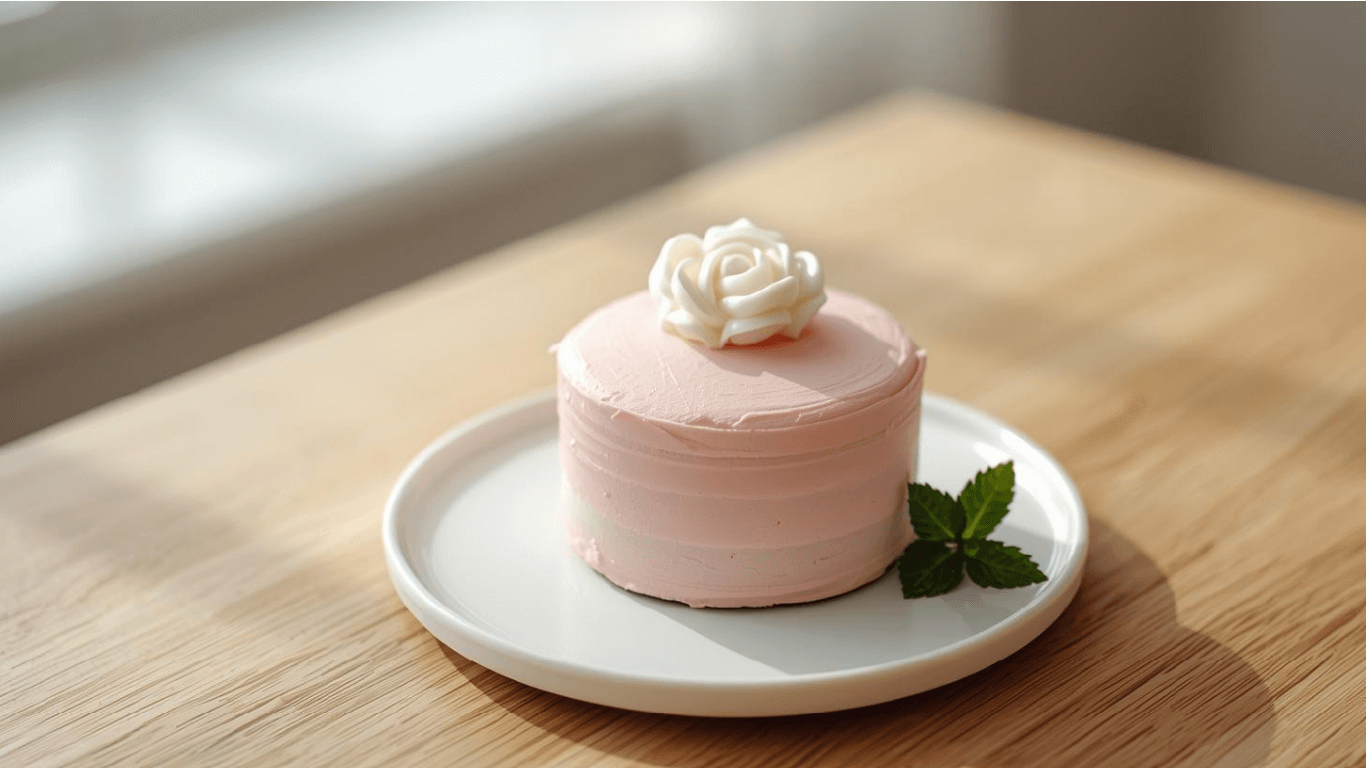
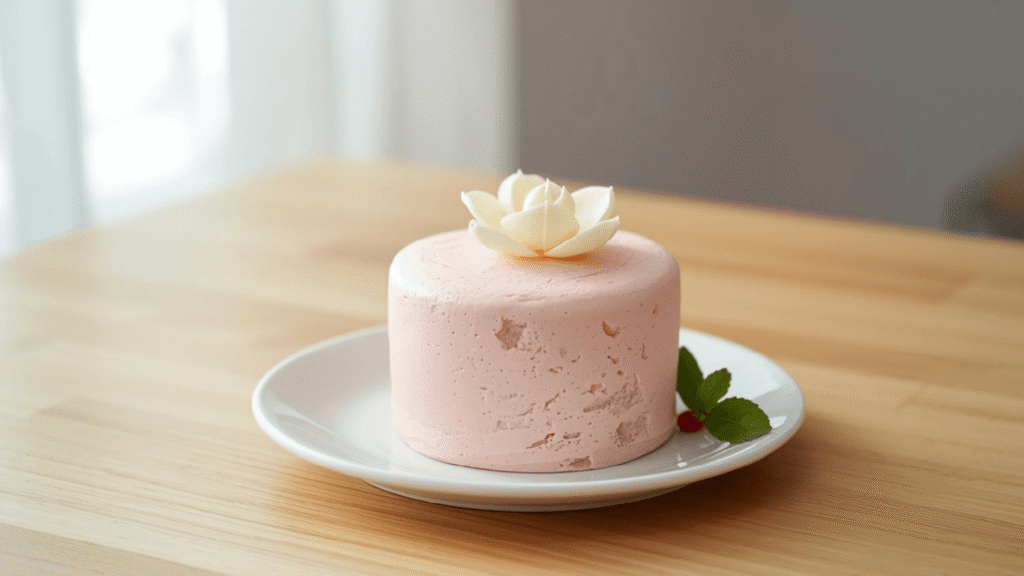
Did you know that mini cakes designed for one person have become 340% more popular in search trends over the past two years, transforming how we celebrate everyday moments? The bento cake phenomenon—inspired by the compartmentalized Japanese lunch box—has revolutionized personal celebrations by offering beautifully decorated, single-serve treats that are both Instagram-worthy and perfectly portioned. These adorable mini cakes, typically measuring just 4 inches square or round, deliver all the indulgence of a full-sized cake without the commitment, waste, or temptation of leftovers calling your name at midnight.
Whether you’re celebrating a quiet personal achievement, surprising a loved one with an intimate gesture, or simply satisfying your sweet tooth without baking an entire layer cake, bento cakes offer the perfect solution. These Korean-inspired treats (also called lunchbox cakes) have captured hearts worldwide with their customizable designs, manageable portions, and the pure joy of having your very own cake. In this comprehensive guide, I’ll walk you through five exceptional bento cake recipes that range from classic vanilla to decadent chocolate, ensuring you’ll find the perfect mini masterpiece for any occasion.
- ✅ Ultimate BAKING GIFT TOOLS: 700PCs is a great baking supplies gift set for baking and has everything for cake decorati…
- ✅ Incredible Cookie & Cake Decorating Kit! Unlock your cake decorating potential with this set of baking tools includes …
- ✅ EASY TO BAKE IN SPRINGFORM PANS: This Baking Pans Set simplifies cake baking in various sizes. Its non-stick surface a…
Ingredients List
For the Classic Vanilla Bento Cake (Base Recipe):
Cake Layer:
- ¾ cup (95g) all-purpose flour (substitute: cake flour for extra tenderness)
- ½ teaspoon baking powder
- ¼ teaspoon salt
- ¼ cup (57g) unsalted butter, softened (substitute: vegetable oil for dairy-free)
- ½ cup (100g) granulated sugar (substitute: coconut sugar for caramel notes)
- 2 large eggs, room temperature
- 1 teaspoon pure vanilla extract
- ¼ cup (60ml) whole milk (substitute: almond or oat milk)
Buttercream Frosting:
- 1 cup (227g) unsalted butter, softened (substitute: vegan butter)
- 2½ cups (300g) powdered sugar, sifted
- 2 tablespoons heavy cream (substitute: coconut cream)
- 1 teaspoon vanilla extract
- Pinch of salt
- Gel food coloring (optional, for decorating)
Decoration Elements:
- Fresh berries, edible flowers, or chocolate shavings
- Sprinkles, pearls, or themed toppers

Variations for the Other 4 Recipes:
Chocolate Bento Cake: Add 3 tablespoons cocoa powder, reduce flour to ⅔ cup
Strawberry Bento Cake: Add ¼ cup freeze-dried strawberry powder, 2 tablespoons strawberry puree
Matcha Bento Cake: Add 2 teaspoons ceremonial-grade matcha powder
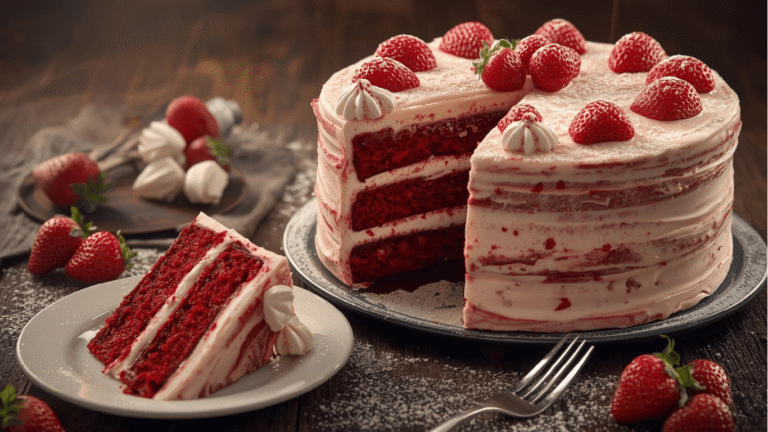
Red Velvet Bento Cake: Add 1 tablespoon cocoa powder, 1 tablespoon red food coloring, ½ teaspoon white vinegar
Timing
Preparation Time: 15-20 minutes Baking Time: 20-25 minutes Cooling Time: 30 minutes Decorating Time: 20-30 minutes Total Time: 85-105 minutes
This represents approximately 35% less time than baking and decorating a traditional 9-inch layer cake, making bento cakes the perfect choice for last-minute celebrations or busy weeknight treats.
Step-by-Step Instructions
Step 1: Prepare Your Baking Environment
Preheat your oven to 350°F (175°C) and position the rack in the center for even heat distribution. Line a 4-inch square or round cake pan with parchment paper, ensuring the paper extends slightly over the edges for easy removal. If you don’t have a small pan, you can use a standard 8-inch pan and cut out your bento cake size after baking. Pro tip: Lightly grease the parchment paper to prevent any sticking issues.
Step 2: Mix the Dry Ingredients
In a medium bowl, whisk together the flour, baking powder, and salt until thoroughly combined. This crucial step ensures even distribution of leavening agents, preventing pockets of baking powder that could create an uneven rise. Sifting isn’t mandatory for this recipe, but it does create a lighter texture if you have the extra minute.
Step 3: Cream Butter and Sugar
Using a hand mixer or stand mixer fitted with the paddle attachment, beat the softened butter and sugar together on medium speed for 3-4 minutes until the mixture becomes pale, fluffy, and increases in volume by about 50%. This creaming process incorporates air into your batter, creating that coveted tender crumb. The mixture should look almost white and feel light when ready.
Step 4: Incorporate Eggs and Vanilla
Add the eggs one at a time, beating well after each addition for about 30 seconds. This gradual incorporation prevents the mixture from curdling. Add the vanilla extract and mix until just combined. Your batter should look smooth and glossy at this stage—if it appears slightly curdled, don’t panic; it will come together when you add the flour.
Step 5: Alternate Wet and Dry Ingredients
Add one-third of the flour mixture to the batter, mixing on low speed until barely combined. Pour in half the milk, mix gently, then repeat with another third of flour, remaining milk, and final flour addition. Mix each addition only until you can no longer see streaks—overmixing develops gluten and creates a tough, dense cake. The entire mixing process should take about 60 seconds total.
Step 6: Bake to Perfection
Pour the batter into your prepared pan, smoothing the top gently with a spatula. Tap the pan firmly on the counter 2-3 times to release air bubbles. Bake for 20-25 minutes, or until a toothpick inserted in the center comes out with just a few moist crumbs. The cake should spring back when gently pressed and will pull slightly away from the pan edges.
Step 7: Cool Completely
Allow the cake to cool in the pan for 10 minutes, then use the parchment paper overhang to lift it onto a wire rack. Cool completely for at least 30 minutes before frosting—this prevents your buttercream from melting into a puddle. For faster cooling, you can refrigerate the cake for 15 minutes once it reaches room temperature.
Step 8: Prepare the Buttercream
While the cake cools, beat the softened butter on medium-high speed for 3-4 minutes until it’s pale and fluffy. Gradually add the powdered sugar, one cup at a time, beating on low speed to prevent a sugar cloud in your kitchen. Once incorporated, add the heavy cream, vanilla, and salt, then beat on high speed for 3-5 minutes until the frosting is light, airy, and holds stiff peaks. Divide and color portions as desired for your design.
Step 9: Level and Layer (Optional)
If your bento cake has a domed top, use a serrated knife to carefully slice it level. For a two-layer effect, cut the cake horizontally through the middle. Spread a thin layer of frosting between layers if splitting, or proceed directly to frosting your single-layer cake.
Step 10: Frost and Decorate Your Bento Cake
Apply a thin crumb coat of frosting across the entire cake, smoothing with an offset spatula or butter knife. Refrigerate for 15 minutes to set. Apply a final, thicker layer of frosting, smoothing the sides and top. Use different piping tips to create borders, rosettes, or writing. Add your chosen decorations—fresh flowers, fruit, or themed toppers—to personalize your creation. Let your creativity shine here; bento cakes are all about expressing personality in a small package.


- Reinforced die-cast aluminum construction ensures long-term durability and reliability while maintaining a lightweight d…
- A top-level, harder nonstick granite material with 10x Ultra Non-stick performance ensures your daily cooking always saf…
- Recommend to hand wash the cookware as it is effortless to clean. Wipe it with a paper towel or rinse it with water.
Nutritional Information
Per Serving (1 bento cake, base vanilla recipe):
- Calories: 680-720 kcal
- Total Fat: 42g (65% DV)
- Saturated Fat: 26g
- Trans Fat: 0g
- Cholesterol: 195mg (65% DV)
- Sodium: 285mg (12% DV)
- Total Carbohydrates: 72g (26% DV)
- Dietary Fiber: 0.5g
- Sugars: 58g
- Added Sugars: 56g
- Protein: 5g (10% DV)
- Vitamin D: 8% DV
- Calcium: 6% DV
- Iron: 8% DV
- Potassium: 3% DV
Note: These values represent approximately 34% of a standard 2,000-calorie daily diet. The compact size naturally encourages portion control compared to traditional cake servings, which often exceed 400 calories per slice. Nutritional values vary based on decorations and flavor variations chosen.
Healthier Alternatives for the Recipe
Transform your bento cake into a more nutritious treat without sacrificing flavor:
Refined Sugar Reduction: Replace half the granulated sugar with unsweetened applesauce or mashed banana (reducing to ¼ cup sugar plus ¼ cup fruit puree). This modification cuts added sugars by 40% while adding natural fiber and moisture. For the frosting, try using 1½ cups powdered erythritol blended with ½ cup powdered sugar for a 60% sugar reduction.
Whole Grain Integration: Substitute half the all-purpose flour with white whole wheat flour or oat flour. This adds 3-4g fiber per serving while maintaining a tender texture. For gluten-free needs, use a 1:1 gluten-free baking flour blend—ensure it contains xanthan gum for proper structure.
Fat Modifications: Replace butter with Greek yogurt at a 1:1 ratio for a protein boost (adding 8-10g protein per cake) and significant fat reduction. Alternatively, use half butter and half unsweetened applesauce to maintain richness while cutting saturated fat by 35%.
Protein Enhancement: Add 2 tablespoons vanilla protein powder to the dry ingredients and increase milk by 1 tablespoon. This modification increases protein content to approximately 12-15g per cake, making it more satiating.
Natural Sweeteners: Use pure maple syrup or honey in place of granulated sugar (use ⅓ cup liquid sweetener and reduce milk to 3 tablespoons). These options provide trace minerals and antioxidants absent in refined sugar.
Frosting Alternatives: Create a lighter cream cheese frosting using equal parts whipped cream cheese and Greek yogurt, or try a whipped coconut cream frosting for a dairy-free, lower-calorie option that cuts frosting calories by approximately 45%.
Serving Suggestions
Elevate your bento cake presentation with these creative serving ideas:
Individual Celebration Moments: Present your bento cake on a small decorative plate with a personalized message piped on top—perfect for birthdays, work anniversaries, congratulations, or “just because” moments. Add a single candle for an intimate celebration that feels special without overwhelming.
Dessert Charcuterie Pairing: Arrange your bento cake alongside complementary treats like chocolate-covered strawberries, macarons, and a small glass of champagne or specialty coffee. This creates an Instagram-worthy dessert experience perfect for date nights or self-care Sundays.
Breakfast Cake Tradition: Serve a less-sweet version as a breakfast treat with fresh fruit, yogurt, and a drizzle of honey. The single-serve format makes it a special weekend morning ritual without the guilt of eating cake for days.
Gift Box Presentation: Place your decorated bento cake in a clear acrylic box tied with ribbon for a stunning gift presentation. Include a small fork and napkin for the recipient’s convenience—this thoughtful gesture has become increasingly popular for surprise deliveries.
Themed Party Stations: For gatherings, create a bento cake decorating station where guests customize pre-frosted mini cakes with various toppings, creating both an activity and dessert. This interactive approach works wonderfully for birthdays, bridal showers, or team-building events.
Afternoon Tea Centerpiece: Serve alongside finger sandwiches and scones for an elevated tea party experience where each guest receives their own personal cake—a modern twist on traditional tea party fare.
Common Mistakes to Avoid
Overmixing the Batter: The number one error in bento cake baking is overmixing once flour is added, which develops excessive gluten and creates a tough, rubbery texture. Research shows that limiting mixing to 30-60 seconds after flour addition produces 40% more tender cakes. Mix only until ingredients are barely combined—a few small lumps are perfectly acceptable.
Using Cold Ingredients: Room temperature eggs, butter, and milk emulsify more effectively, creating a smoother batter with better structure. Cold ingredients can cause the batter to curdle or separate, resulting in a dense, uneven cake. Plan ahead by setting ingredients out 60-90 minutes before baking.
Incorrect Oven Temperature: An oven that’s too hot causes rapid rising and then collapse, while too cool extends baking time and dries out your cake. Invest in an oven thermometer—studies indicate that 70% of home ovens run 25°F higher or lower than displayed. Accurate temperature ensures consistent results.
Frosting Warm Cake: This rookie mistake creates a melted, sliding frosting disaster. Your cake must be completely cool (ideally around 70°F internally) before frosting application. Patient bakers are rewarded with crisp, professional-looking decorations that hold their shape.
Skipping the Crumb Coat: Applying frosting directly to unfrosted cake incorporates crumbs into your final layer, creating a messy appearance. The thin initial crumb coat (refrigerated for 15 minutes) seals in loose crumbs, allowing your final frosting layer to appear smooth and professional.
Overloading with Decorations: While enthusiastic decorating is tempting, overcrowded designs look cluttered on small bento cakes. Choose 2-3 complementary decoration elements for a clean, elegant appearance that photographs beautifully. Remember: negative space is your friend in miniature designs.
Incorrect Pan Preparation: Inadequate greasing or missing parchment paper leads to stuck cakes that crumble when removed. Always line with parchment and lightly grease, even with non-stick pans—this simple step ensures easy release 99% of the time.
Storing Tips for the Recipe
Room Temperature Storage: Unfrosted bento cakes remain fresh at room temperature for 2 days when wrapped tightly in plastic wrap and stored in an airtight container. This method maintains the cake’s tender texture without drying. However, frosted cakes with buttercream should be refrigerated after 2 hours to prevent bacterial growth, especially in warm climates.
Refrigeration Guidelines: Store frosted bento cakes in airtight containers in the refrigerator for up to 5 days. Before serving, allow the cake to sit at room temperature for 20-30 minutes—this removes the chill from the buttercream and restores the cake’s soft texture. Cover loosely with plastic wrap to prevent condensation from dripping onto decorations.
Freezing Instructions: Freeze unfrosted cake layers wrapped in plastic wrap and aluminum foil for up to 3 months without quality loss. Frosted bento cakes can also be frozen: place in the freezer unwrapped for 30 minutes to harden the frosting, then wrap carefully in plastic wrap and foil. Thaw overnight in the refrigerator, then bring to room temperature before serving.
Buttercream Storage: Prepared buttercream frosting stores beautifully in an airtight container in the refrigerator for 2 weeks or frozen for 3 months. Before using refrigerated frosting, let it come to room temperature, then re-whip for 2-3 minutes to restore its light, fluffy texture.
Ingredient Prep-Ahead: Measure dry ingredients up to 1 week ahead and store in an airtight container. This time-saving technique reduces active baking time by 30%, making spontaneous bento cake baking more realistic on busy days.
Decoration Preservation: If your bento cake features fresh flowers or fruit, add these immediately before serving for the best appearance. Prepare all other decorations (piped borders, fondant pieces) up to 2 days ahead and store in a cool, dry place until assembly.
Conclusion
Bento cakes represent the perfect fusion of artistic expression, portion control, and celebratory indulgence in a personal-sized package. These five versatile recipes—from classic vanilla to rich chocolate—provide endless customization opportunities while maintaining foolproof techniques that guarantee success. By following proper ingredient temperatures, avoiding overmixing, and embracing creative decoration, you’ll create bakery-quality mini masterpieces that make every day feel special.
Ready to start your bento cake journey? Choose your favorite flavor variation, gather your ingredients, and experience the joy of creating these adorable single-serve desserts. After trying the recipe, share your beautiful creations and results in our review section below—we’d love to see your unique decorating styles! Don’t forget to subscribe for more innovative baking tutorials, recipe variations, and exclusive tips delivered directly to your inbox. Your personal cake celebration awaits!

- SET INCLUDES: Two 10-inch x 15-inch cookie pans, Two 9-inch round cake pans, 9-inch square cake pan, 2 loaf pans, 9-inch…
- EVERYDAY DURABILITY: This Rachael Ray nonstick bakeware set features heavy gauge steel construction with rolled-rim bake…
- LONG-LASTING NONSTICK: The baking pans feature long-lasting, latte-colored nonstick inside and out to provide excellent …
FAQs
Q: Can I make bento cakes without special small pans?
A: Absolutely! You have several options: bake in a standard 8-inch pan and cut 4-inch squares or rounds using a cookie cutter or template, use small 4-inch disposable aluminum pans available at craft stores, or repurpose clean, oven-safe containers like small metal tins. You can even bake in a muffin tin for mini round layers, though you’ll need 2-3 muffin cups per cake.
Q: How far in advance can I make a bento cake?
A: For optimal freshness, bake the cake layers up to 2 days ahead and store wrapped at room temperature or refrigerated. Frost and decorate the day before your event and refrigerate. For longer prep, freeze unfrosted layers up to 3 months in advance. The sweet spot for best taste and texture is baking 1 day ahead and decorating the morning of your celebration.
Q: Why is my bento cake dense instead of fluffy?
A: Dense cakes typically result from overmixing the batter after adding flour (develops too much gluten), using cold ingredients (prevents proper emulsification), or inaccurate measurements (too much flour, too little leavening). Ensure you’re measuring flour correctly by spooning it into measuring cups rather than scooping, which can pack 25% more flour than intended. Also verify your baking powder is fresh—expired leavening agents lose potency.
Q: Can I make bento cakes dairy-free or vegan?
A: Yes! Replace butter with vegan butter or coconut oil, use plant-based milk (oat or almond work beautifully), and substitute eggs with flax eggs (1 tablespoon ground flaxseed + 3 tablespoons water per egg, let sit 5 minutes). For vegan buttercream, use vegan butter with powdered sugar and plant-based cream. The texture remains remarkably similar to traditional versions with these simple swaps.
Q: What’s the best way to write on bento cakes?
A: Use a piping bag fitted with a small round tip (size 2-4) filled with contrasting color buttercream or royal icing. Practice your message on parchment paper first, then pipe directly onto the frosted cake with steady, even pressure. Alternatively, use edible markers for precise lettering, or create fondant letter cutouts for a dimensional effect. For beginners, stencils provide fool-proof lettering—simply hold against the cake and pipe through the openings.
Q: Can I double the recipe to make multiple bento cakes at once?
A: Definitely! This recipe doubles and triples successfully. Simply multiply all ingredients and divide the batter between multiple small pans. Baking time remains the same—watch for the toothpick test rather than relying solely on time. This approach is perfect for making multiple flavors for variety or preparing several gifts simultaneously. Just ensure your oven can accommodate multiple pans with adequate air circulation (space pans 2 inches apart).