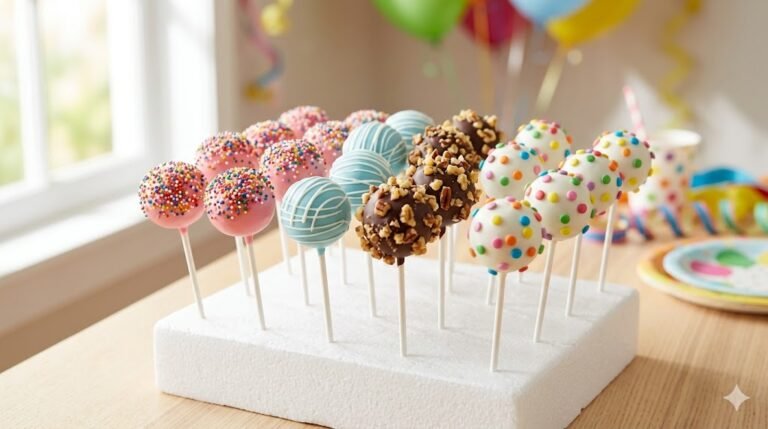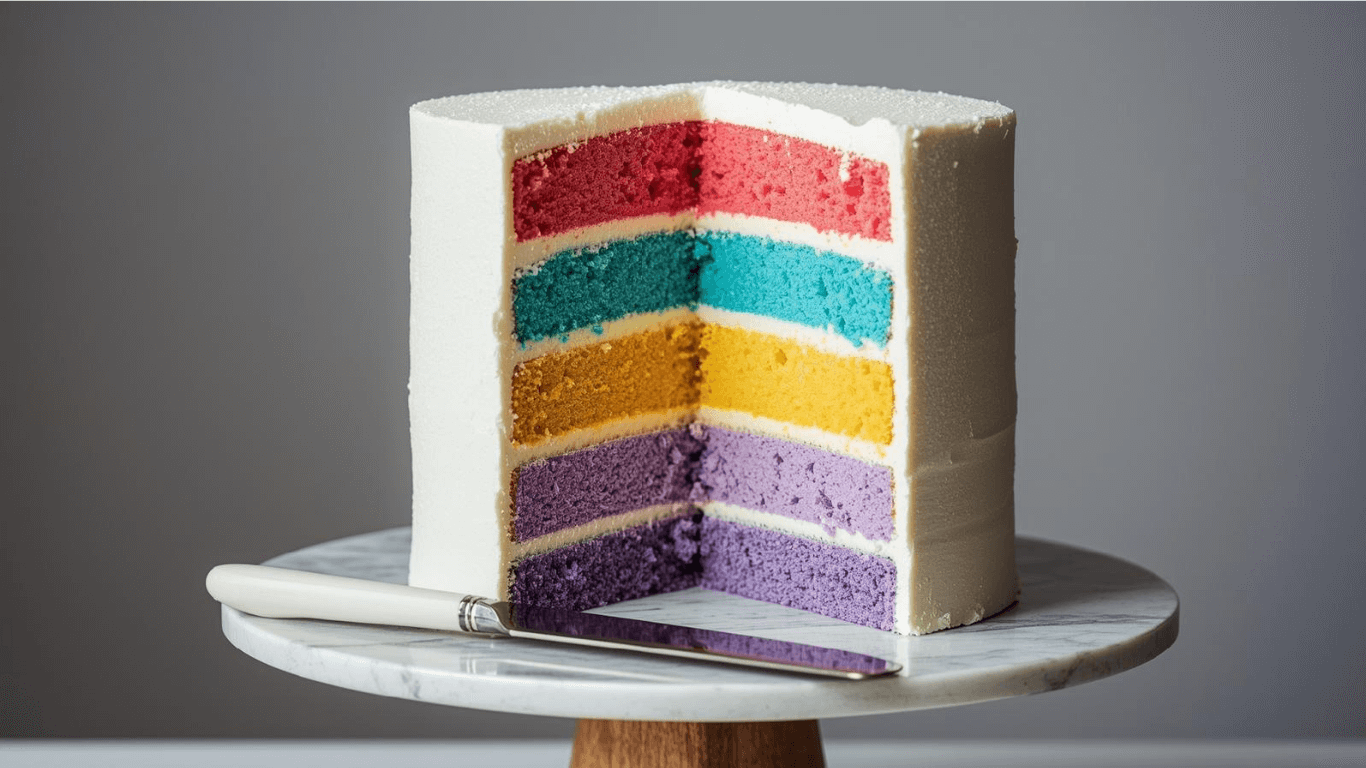
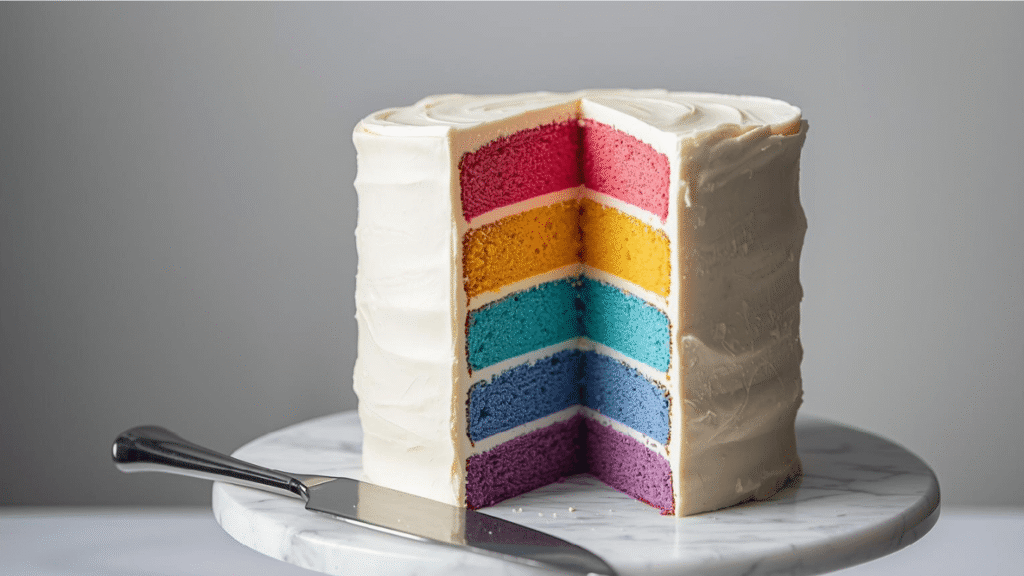
Did you know that in a recent survey on nostalgic food memories, 78% of respondents cited “colorful birthday cakes” as their most vivid childhood recollection, outranking even the presents? It raises a compelling question: Why limit the celebration to the outside of the cake when the inside can be the real party? Enter the Ribbon Cake—a masterpiece of baking engineering that reveals distinct, vibrant bands of color with every slice.
Unlike a standard marble cake where colors are chaotic, a true Ribbon Cake is a deliberate architecture of joy. It transforms the act of slicing into a theatrical reveal, instantly elevating the mood of any gathering. However, achieving those clean, defined lines without drying out the sponge is a common challenge for home bakers.
In this guide, we are decoding the physics of batter density and color theory. We will walk you through a foolproof method to create a moist, buttery vanilla cake threaded with stunning “ribbons” of color. Get ready to bake the most instagrammable birthday treat of the year.

Ingredients List
To ensure your Ribbon Cake has structurally sound layers that don’t bleed into one another, we need a batter with high viscosity (thickness) and stability.
The Foundation:
- Cake Flour (3 cups / 360g): The low protein content ensures a tender crumb that doesn’t get tough during the extra mixing required for coloring. Sub: All-purpose flour minus 3 tbsp, plus 3 tbsp cornstarch.
- Unsalted Butter (1 ½ cups / 340g): Room temperature. This high fat content creates the dense, moist crumb characteristic of ribbon cakes.
- Granulated Sugar (2 cups / 400g): Provides the necessary crunch for the crust and moisture for the interior.
- Eggs (5 large): Room temperature. These provide the protein scaffolding.
The Flavor & Liquid:
- Whole Milk (1 cup / 240ml): Adds richness.
- Vanilla Extract (1 tbsp): High quality is essential as the base flavor is simple.
- Almond Extract (½ tsp): Optional: This is the “secret” ingredient in many bakery-style ribbon cakes that adds a nostalgic aroma.
The Visuals:
- Gel Food Coloring: (Pink, Green, and Yellow are traditional). Crucial: Do not use liquid drops; they add water and will cause the colored ribbons to sink.

- Reinforced die-cast aluminum construction ensures long-term durability and reliability while maintaining a lightweight d…
- A top-level, harder nonstick granite material with 10x Ultra Non-stick performance ensures your daily cooking always saf…
- Recommend to hand wash the cookware as it is effortless to clean. Wipe it with a paper towel or rinse it with water.
Timing
This recipe is optimized for efficiency, but creating art takes a moment of focus during the layering step.
- Prep Time: 35 minutes
- Baking Time: 45–50 minutes
- Cooling Time: 60 minutes
- Decorating Time: 30 minutes
- Total Time: Approx. 2 hours 45 minutes
- Time Insight: While this takes about 15% longer to prep than a standard yellow cake due to the batter division, the visual payoff eliminates the need for complex exterior decoration, saving you time overall.
Step-by-Step Instructions
Step 1: The High-Ratio Creaming
Preheat oven to 350°F (175°C). Grease and flour a deep 9×13 inch pan or two 8-inch round pans.
In a stand mixer, beat the butter and sugar on medium-high speed for a full 5-7 minutes.
- The Science: You are looking for a pale, almost white mixture. This mechanical aeration is vital because the coloring process later will knock some air out. We need to build a surplus of bubbles now.
Step 2: The Emulsion
Add eggs one at a time, beating well after each addition. Scrape down the bowl—this is where unmixed butter hides. Whisk the flour, baking powder (3 tsp), and salt (1 tsp) in a separate bowl. Add the dry ingredients alternately with the milk (Dry-Wet-Dry-Wet-Dry), ending with flour.
- Texture Check: The batter should be thick, glossy, and hold its shape. If it’s runny, the ribbons will merge.
Step 3: The Chromatic Division
Divide the batter evenly into three bowls (use a scale for precision).
- Bowl A: Leave plain (or dye yellow).
- Bowl B: Add a drop of Pink Gel.
- Bowl C: Add a drop of Green Gel.
- Action: Fold the color in gently with a spatula. Do not beat it, or you will over-develop the gluten and get tough ribbons.
Step 4: The Ribbon Technique
This is the moment of truth.
- Method: Drop spoonfuls of batter into the prepared pan in a checkerboard pattern (Pink, White, Green).
- The Layering: Once the bottom is covered, add a second layer of spoonfuls, placing contrasting colors on top of the base layer (e.g., Green on top of Pink).
- The Swirl: Take a butter knife and run it through the batter once in a zigzag pattern lengthways, then once widthways. STOP. Do not over-swirl, or you will get a muddy grey cake.
Step 5: The Bake & Bloom
Bake for 45–50 minutes. The Ribbon Cake is dense, so it bakes slower than a sponge.
- Doneness: A skewer inserted into the center should come out clean.
- Cooling: Let it cool in the pan for 15 minutes before inverting. This structure needs to set before moving.
Discover your next baking masterpiece. Click for sweet inspiration!
Bluey Cake Ideas: How to Make a Simple Bandit Cake (The Ultimate Guide)
Princess Cake: 3 Things To Know Before You Start Baking
Banana Cake: How to Achieve Perfect Moistness in 5 Steps
Harry Potter Cake: A 4-Step Hedwig Owl Cake Guide
Nutritional Information
A slice of celebration comes with energy. Here is the breakdown per serving (based on 16 squares).
| Nutrient | Amount per Serving |
| Calories | 380 kcal |
| Total Fat | 18g |
| Saturated Fat | 11g |
| Carbohydrates | 52g |
| Sugars | 35g |
| Protein | 4g |
Data Insight: This profile is comparable to a pound cake. The high fat content is what preserves the moisture in the colored sections.
- ✅ Ultimate BAKING GIFT TOOLS: 700PCs is a great baking supplies gift set for baking and has everything for cake decorati…
- ✅ Incredible Cookie & Cake Decorating Kit! Unlock your cake decorating potential with this set of baking tools includes …
- ✅ EASY TO BAKE IN SPRINGFORM PANS: This Baking Pans Set simplifies cake baking in various sizes. Its non-stick surface a…
Healthier Alternatives for the Recipe
You can modernize this classic for health-conscious guests.
- Whole Grain Twist: Substitute 50% of the cake flour with White Whole Wheat Flour. It adds fiber without the bitterness of red wheat, and the nutty flavor pairs well with the almond extract.
- Reduced Sugar: Use Allulose as a 1:1 sugar substitute. It browns like sugar but has zero glycemic impact, making the cake diabetic-friendly.
- Natural Pigments:
- Pink: Beetroot powder (dissolved in a tsp of milk).
- Green: Matcha powder or Pandan extract.
- Yellow: Turmeric (use sparingly) or Saffron infused milk.
- Note: Natural colors are more pastel and earthy but add wonderful functional health benefits.
Serving Suggestions
The Ribbon Cake is a visual stunner that needs little embellishment.
- The Classic Cut: Slice into squares or thick rectangles to best display the “ribbon” cross-section.
- Frosting Pairing: A simple Vanilla Buttercream or a White Chocolate Ganache works best. You want a white exterior to contrast the explosion of color inside.
- Birthday Style: Serve with a scoop of vanilla bean ice cream. The temperature contrast between the dense, room-temp cake and the cold ice cream is a sensory delight.
Common Mistakes to Avoid
- The “Muddy” Mix:
- The Error: Swirling the batter too aggressively in the pan.
- The Fix: Less is more. A simple “figure 8” motion is enough. You want distinct blobs of color, not a homogeneous mix.
- Liquid Dye Disaster:
- The Error: Using supermarket liquid food coloring.
- The Insight: Liquid dyes alter the hydration percentage of the batter, causing the colored sections to sink to the bottom or bake with a different texture than the plain sections. Always use gel.
- Oven Peeking:
- The Error: Opening the door too early.
- The Result: The cake collapses in the center. Ribbon cakes are heavy; they need consistent heat to rise. Do not open the door until the 40-minute mark.
Storing Tips for the Recipe
Preserve the freshness of your colorful creation.
- Room Temp: Store in an airtight cake carrier for up to 3 days. The high butter content keeps it moist.
- The “Crumb Lock”: If you have cut the cake, press a piece of parchment paper directly against the cut face to prevent the exposed ribbons from drying out.
- Freezing: Slice the cake, wrap each slice in cling film, then foil. They keep for 3 months. Thaw on the counter for a “fresh-baked” taste.
Conclusion
The Ribbon Cake is more than a dessert; it is a slice of nostalgia and a testament to the joy of baking. By controlling your batter consistency and resisting the urge to over-swirl, you create a birthday centerpiece that is beautiful, buttery, and brimming with life. It’s a simple technique with a high-impact reward.
Ready to paint with batter? We want to see your ribbon designs! Tag us in your photos, leave a review below, and subscribe to our newsletter for more colorful culinary science.
FAQs
Q: Can I use this recipe for a 3-layer round cake?
A: This usually happens if the batter is too thin (too much liquid) or the colors were heavy. Ensure you use cake flour and stick to the butter/sugar ratios to keep the batter thick enough to suspend the dye.
Q: Can I use different flavor extracts for each color?
A: Theoretically yes, but be careful. Combining Strawberry (pink), Mint (green), and Lemon (yellow) might result in a confusing flavor profile. It is safer to stick to one unifying flavor like vanilla or almond.
Q: Is this the same as Sri Lankan Ribbon Cake?
A: Very similar! The traditional Sri Lankan version typically uses distinct pink and green swirls and is almost always flavored with almond and vanilla, often served at weddings. This recipe honors that tradition while being accessible for any birthday.
Your feedback helps other cooks succeed. Rate this recipe!
Gorgeous, But a Patience Project
I made this Ribbon Cake for a retirement party, and it was the talk of the event. The visual “wow” factor when sliced is undeniable. The flavor was fantastic—a delicious, classic vanilla. My challenge was the assembly. Getting the four colored layers perfectly even and level was trickier than I anticipated, and my frosting skills are only so-so. The end result was beautiful but clearly homemade, not bakery-perfect. This recipe is fantastic if you have the time and a bit of decorating experience. Plan for a whole afternoon.
A Total Showstopper!
This Ribbon Cake was a monumental hit at my daughter’s unicorn-themed birthday. The layers were so vibrant and clean, just like the picture! The instructions for dividing and coloring the batter were perfect, and using gel food coloring was absolutely the key. The cake itself was incredibly moist and rich—the sour cream and buttermilk made all the difference. It was a big project with a lot of bowls to wash, but the stunned looks and happy birthday cheers made every minute worthwhile. A true celebration cake!