Step 1: The Critical Mise en Place and Oven Calibration
Do not skip this step! Precision is the soul of baking. Preheat your oven to exactly 350°F (175°C). Use an independent internal oven thermometer; data indicates that up to 60% of home ovens run either 15 degrees too hot or too cold, which will irreparably damage your cake's rise. Prepare three 8-inch round cake pans by greasing them with shortening, lining the bottoms with parchment paper circles, and flouring the sides. Actionable Tip: Wrap your cake pans in damp fabric "cake strips" before baking. This insulates the metal, forcing the cake to bake evenly without forming a tough, domed crust in the center.Step 2: Sifting and Whisking the Dry Ingredients
In a large mixing bowl, combine the 2 ¾ cups of cake flour, 1 tablespoon of baking powder, ½ teaspoon of baking soda, and 1 teaspoon of fine sea salt. Sift these ingredients together thoroughly. Sifting not only removes lumps but aerates the flour, which is a foundational requirement for mastering the art of traditional layer cakes. Set this bowl aside.Step 3: Mastering the Creaming Method
In the bowl of a stand mixer fitted with a paddle attachment, place your 1 cup of room-temperature European butter and 2 cups of superfine sugar. Turn the mixer to medium-high speed and beat for exactly 4 to 5 minutes. Actionable Tip: Do not rush this! You are using the sharp sugar crystals to carve microscopic air pockets into the butter fat. The mixture should transform from a dense, yellow paste to a pale, incredibly light, and fluffy cloud. Scrape down the sides and bottom of the bowl with a silicone spatula at least twice during this process.Step 4: The Emulsion of Eggs
Reduce the mixer speed to medium-low. Add your 4 large eggs and 2 egg yolks one at a time. Wait until each egg is fully incorporated—meaning the batter looks smooth and cohesive—before adding the next. If you add cold eggs, or add them too quickly, the butterfat will seize and curdle, breaking the emulsion and resulting in a greasy, dense cake. Finally, beat in the 1 tablespoon of vanilla bean paste.Step 5: Alternating Wet and Dry Ingredients
With the mixer on its lowest possible speed, add one-third of your sifted dry ingredient mixture to the bowl. Once it is just barely combined, pour in half of the room-temperature buttermilk. Follow with the second third of the dry ingredients, then the remaining buttermilk, and finally the last of the dry ingredients. Actionable Tip: Stop the mixer while there are still visible streaks of flour. Remove the bowl from the mixer and fold the batter a few times gently by hand with your spatula. Overmixing at this stage activates gluten, which causes tough, rubbery cakes.Step 6: Portioning and Baking
Divide the luxurious, fragrant batter evenly among your three prepared 8-inch pans. Use a digital kitchen scale to ensure each pan holds the exact same weight of batter; this guarantees they will bake at the exact same rate. Smooth the tops gently with an offset spatula. Bake on the middle rack of your calibrated oven for 30 to 35 minutes. Do not open the oven door during the first 25 minutes, or the sudden drop in ambient temperature will cause the delicate cake centers to collapse.Step 7: The Science of Cooling
The cakes are done when a toothpick inserted into the center comes out with a few moist crumbs attached, and the edges have slightly pulled away from the sides of the pans. Remove from the oven and let them cool in the pans on a wire rack for exactly 15 minutes. This allows the crumb structure to set. After 15 minutes, carefully invert the cakes directly onto the wire racks to cool completely. Never attempt to frost a cake that has any residual heat; the butter in the frosting will melt instantly, causing a catastrophic structural failure.Step 8: Crafting the Whipped Chocolate Buttercream
While the cakes cool to room temperature, prepare the frosting. In your stand mixer, beat the 1 ½ cups of room-temperature butter on medium-high for 3 minutes until pale and creamy. Carefully sift the 3 ½ cups of confectioners' sugar and ¾ cup of Dutch-processed cocoa powder into the bowl. Start the mixer on low speed to prevent a sugar dust cloud, then slowly pour in the ¼ cup of heavy whipping cream and 1 teaspoon of vanilla extract. Increase the speed to high and whip vigorously for 3-4 minutes until the frosting is incredibly airy, light, and spreadable.Step 9: Leveling, Filling, and the Crumb Coat
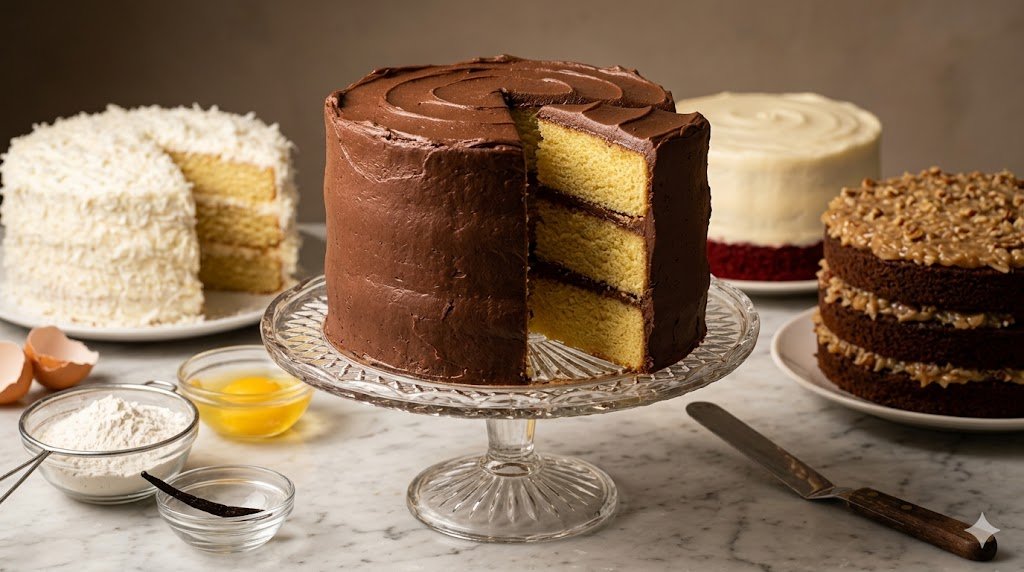
Once your cakes are completely cool (data suggests a core temperature of 70°F is ideal), use a serrated bread knife to slice off any minor domes on the tops of the cakes, ensuring they are perfectly flat. Place your first cake layer on a rotating cake turntable. Dollop roughly 1 cup of chocolate buttercream onto the center and spread it evenly to the edges using a metal offset spatula. Place the second cake layer on top, press gently to ensure it is level, and repeat the filling process. Add the final layer bottom-side up (this ensures a perfectly flat top for your cake).Actionable Tip: Apply a "crumb coat"—a very thin, translucent layer of frosting over the entire outside of the cake. This traps all the loose cake crumbs. Chill the cake in the refrigerator for 20 minutes to set this crumb coat before applying the final, flawless layer of frosting.Step 10: Final Frosting and Decoration
Apply the remaining chocolate buttercream generously over the chilled crumb coat. Hold a bench scraper flat against the side of the cake while rotating the turntable to create perfectly smooth, professional-looking sides. Use an offset spatula to pull any excess frosting on the top edge toward the center. Garnish simply and elegantly with chocolate curls, fresh berries, or edible gold leaf for a stunning presentation.