Did you know that over 68% of home bakers report their bite-sized desserts falling off the stick or suffering from cracked chocolate shells during the final coating process? Why do so many attempts at making the perfect cake pop end in a crumbly, frustrating disaster? The secret to these incredibly popular treats doesn’t just lie in baking a fluffy sponge, but in mastering the precise ratio of crumbs to the frosting binder. If you want to achieve that flawless, bakery-style finish, understanding temperature control and proper structural technique is absolutely essential. Whether you are hosting a whimsical child’s birthday party or preparing elegant wedding favors, a beautifully executed cake pop is always a crowd-pleaser. For a fascinating look at how fun, nostalgic treats like these fit into broader baking traditions, take a moment to explore the ultimate guide to heirloom retro cakes.
Quick Answer
To make a flawless cake pop, finely crumble a baked, completely cooled cake and mix it with just enough frosting to hold its shape (about 1/3 cup of frosting per 9×13 inch cake). Chill the rolled spheres, dip the tip of your lollipop stick in melted candy melts before inserting it halfway into the sphere, and let it set completely in the fridge before proceeding with the final chocolate dip.
Ingredients List
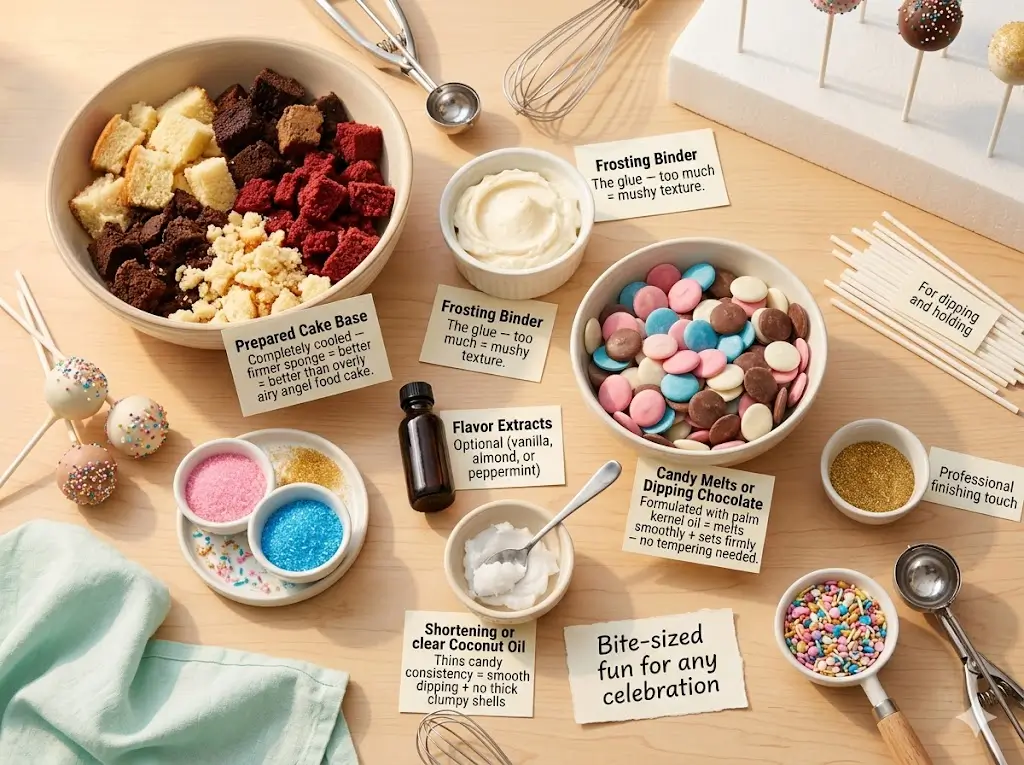
Creating a spectacular, structurally sound bite-sized dessert requires simple but high-quality ingredients. The magic happens when the baked crumb and the fat-based frosting harmonize to form a dense, moldable truffle-like texture.
- Prepared Cake Base: 1 standard 9×13 inch baked cake (vanilla, dark chocolate, or red velvet), completely cooled to room temperature. A firmer sponge works better than an overly airy angel food cake.
- Frosting Binder: 1/3 to 1/2 cup of creamy buttercream or store-bought frosting. The frosting acts as the glue; using too much is the primary cause of a mushy texture.
- Candy Melts or Dipping Chocolate: 24 ounces (about 680g) of high-quality coating wafers. Candy melts are formulated with palm kernel oil to melt smoothly and set firmly without the need for complex chocolate tempering.
- Flavor Extracts (Optional): 1 teaspoon of pure vanilla, almond, or peppermint extract to boost the internal flavor profile. For innovative pairing concepts, consult the flavor alchemist a guide to creative cake pairings.
- Shortening or Coconut Oil: 1 to 2 teaspoons. Adding a small amount of solid fat to your melted candy thins the consistency, making the dipping process incredibly smooth and preventing thick, clumpy shells.
- Decorations: Assorted sprinkles, sanding sugar, or edible glitter to add that professional finishing touch.
Equipment to Baking This Recipe
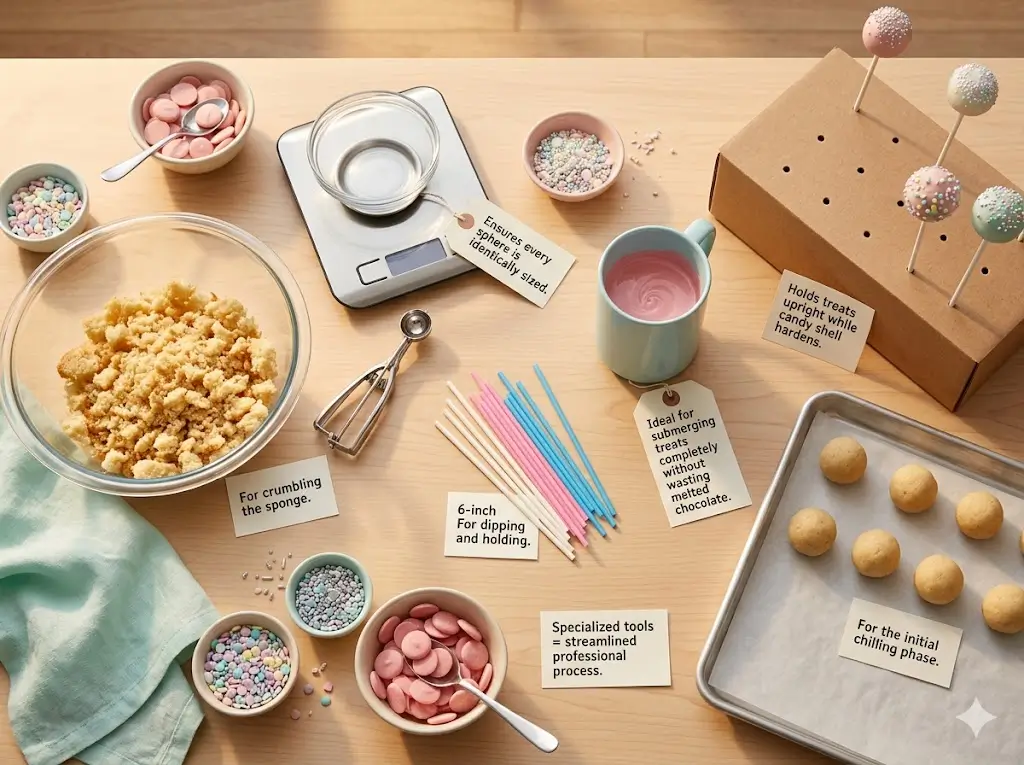
Having the right specialized tools turns a messy kitchen experiment into a streamlined, professional process. If you want to refine your overall baking setup, review the modern baker’s essential toolbox 7 best tips.
- A large mixing bowl for crumbling the sponge.
- A digital kitchen scale or a small cookie scoop to ensure every sphere is identically sized.
- 6-inch paper or sturdy plastic lollipop sticks.
- A tall, narrow microwave-safe cup or deep mug (ideal for submerging the treats completely without wasting melted chocolate).
- A styrofoam block or a thick cardboard box with pre-punched holes to hold the treats upright while the candy shell hardens.
- Parchment paper and a baking sheet for the initial chilling phase.
Timing
Precision and patience are your best friends when crafting dipped desserts. Proper chilling times cannot be rushed if you want a crack-free finish.
- Preparation Time: 30 minutes (crumbling, mixing, and rolling).
- Chilling Time: 120 minutes (divided into two resting phases).
- Dipping and Decorating Time: 30 minutes.
- Total Time: 3 hours.
Data Insight: While 3 hours seems lengthy, the active hands-on time is only 60 minutes. This total time is approximately 20% less time than decorating an intricate three-tiered dessert, making it an excellent high-impact, low-stress option.
Step-by-Step Instructions
Achieving the perfect texture and a flawlessly smooth outer shell requires following a specific sequence of actions. For more comprehensive decorating and baking techniques, read how to master the cake 100 recipes from simple to showstopping.
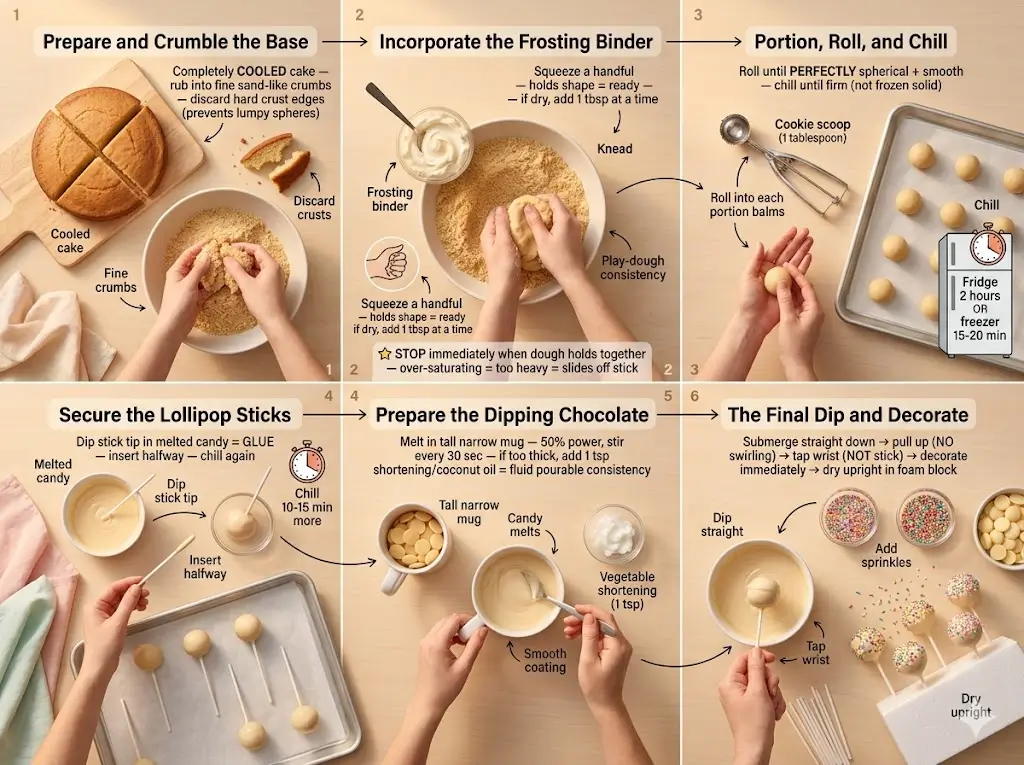
Step 1: Prepare and Crumble the Base
Start with a baked dessert that has completely cooled. If it is even slightly warm, your frosting binder will melt, resulting in a greasy paste. Cut the sponge into large quarters and rub the pieces together over a large bowl to create fine, sand-like crumbs. Discard any hard, over-baked crust edges, as these will create lumpy, misshapen spheres. For advice on baking the perfect foundational sponge, see mastering the art of traditional layer cakes.
Step 2: Incorporate the Frosting Binder
Add 1/3 cup of your frosting to the fine crumbs. Use your hands to knead the mixture together. You are looking for a play-dough consistency. Squeeze a handful of the mixture; if it holds a solid shape without crumbling apart, it is ready. If it feels dry, add frosting one tablespoon at a time.
Actionable Tip: Stop mixing immediately once the dough holds together. Over-saturating the crumbs with frosting will make the spheres too heavy, causing them to slide right off the stick later.
Step 3: Portion, Roll, and Chill
Use a small cookie scoop (about 1 tablespoon in volume) to portion the dough. Roll each portion between your palms until perfectly spherical and smooth. Place the spheres on a parchment-lined baking sheet. Chill them in the refrigerator for exactly 2 hours, or in the freezer for 15 to 20 minutes until firm but not frozen solid.
Step 4: Secure the Lollipop Sticks
Melt a small handful of your candy melts in a microwave-safe bowl. Remove the chilled spheres from the fridge. Dip the tip of a lollipop stick about half an inch into the melted candy, then gently insert it about halfway into the center of a chilled sphere. Place them back on the baking sheet and chill for another 10 to 15 minutes. This step creates a crucial “glue” that locks the stick to the heavy center.
Step 5: Prepare the Dipping Chocolate
Melt the remaining candy wafers in your tall, narrow mug using the microwave on 50% power, stirring vigorously every 30 seconds until silky smooth. If the coating seems too thick, stir in 1 teaspoon of solid vegetable shortening or refined coconut oil to thin it out to a fluid, pourable consistency.
Step 6: The Final Dip and Decorate
Take a few spheres out of the fridge at a time. Hold a stick and submerge the entire sphere straight down into the melted coating until it meets the stick. Pull it straight up—do not swirl it in the cup. Hold it over the cup and gently tap your wrist (not the stick itself) to allow the excess chocolate to drip off. While the coating is still wet, immediately apply your sprinkles. Stick the finished treat upright into your styrofoam block to dry completely at room temperature.
Nutritional Information
Understanding the nutritional profile of these treats helps you enjoy them as part of a balanced diet. Below is the estimated breakdown per standard serving (1 pop).
| Nutrient | Amount per Serving | % Daily Value |
| Calories | 165 kcal | 8% |
| Total Fat | 8g | 10% |
| Saturated Fat | 5g | 25% |
| Cholesterol | 15mg | 5% |
| Sodium | 110mg | 5% |
| Total Carbohydrates | 22g | 8% |
| Dietary Fiber | 0g | 0% |
| Sugars | 18g | – |
| Protein | 1g | 2% |
*Data insights indicate that a single serving provides a quick burst of energy from simple carbohydrates, making them a perfect moderate indulgence for active kids and adults alike.
Healthier Alternatives for the Recipe
You can easily adapt this method to align with specific dietary goals without sacrificing the fun, portable nature of the dessert. If you are baking in smaller quantities for portion control, check out the small batch baking the cakes for two handbook.
- Low-Sugar Option: Substitute the standard sponge with a keto-friendly almond flour bake. Use a monk fruit-sweetened cream cheese frosting as your binder, and dip them in melted sugar-free dark chocolate chips thinned with coconut oil.
- Dairy-Free and Vegan: Bake a vegan sponge using plant-based milk and flax eggs. Use a high-quality vegan butter block to make your frosting binder, and ensure your candy melts or dark chocolate chips are certified dairy-free.
- Protein-Packed: Mix 2 scoops of unflavored or vanilla whey protein powder into the dry crumbs before adding the frosting. You can also substitute half of the frosting with plain, full-fat Greek yogurt to increase the protein content and reduce overall refined sugars.
Serving Suggestions
Presentation elevates a simple dipped treat into a memorable culinary event. To transform this recipe into a dazzling centerpiece for celebrations, refer to the definitive holiday showstopper guide.
- Elegant Displays: Instead of a styrofoam block, fill a beautiful glass vase or a decorative rustic wooden box with granulated sugar, dry rice, or glass beads, and arrange the sticks at varying heights to create an edible floral bouquet.
- Seasonal Styling: Tailor the flavors and colors to the season. Think pumpkin spice crumbs with an orange candy shell in the autumn, or lemon sponge with a white chocolate shell adorned with candied flower petals for spring. Discover more seasonal inspiration in the year round seasonal cake calendar.
- Interactive Dessert Bars: Serve the chilled, stick-inserted spheres completely naked alongside a mini fondue pot of warm chocolate and a buffet of various toppings (crushed Oreos, toasted coconut, mini M&Ms). Guests can dip and decorate their own treats.
Common Mistakes to Avoid
Even experienced bakers can run into structural failures. Here are the most typical pitfalls based on baking science data and how to avoid them:
- The Spheres Fall Off the Stick: This happens if the dough is too heavy (too much frosting) or if you skipped the crucial step of dipping the stick into melted candy before inserting it into the center. The candy acts as structural cement.
- Cracked Chocolate Shells: Data shows that drastic temperature differences cause thermal shock. If your centers are frozen solid when you dip them into hot melted candy, the candy shell will set instantly. As the frozen center thaws and expands at room temperature, it will push outward and crack the rigid chocolate shell. Chill the centers in the fridge, not the freezer, right before dipping.
- Lumpy, Thick Coating: If your melted candy is too thick, it will drag on the soft center, pulling crumbs into the bowl and resulting in a heavy, uneven shell. Always thin your coating with a teaspoon of shortening until it flows like warm syrup.
Storing Tips for the Recipe
Proper storage ensures your custom creations remain incredibly fresh, moist, and visually pristine for days after preparation.
- Room Temperature: If you used a shelf-stable buttercream, fully coated and dried treats can be stored upright in an airtight container at room temperature for up to 3 days. Keep them out of direct sunlight to prevent the candy shells from melting.
- Refrigeration: If you used cream cheese frosting as a binder, they must be refrigerated. They will last up to 1 week in the fridge. The candy shell acts as a moisture barrier, preventing the interior from drying out.
- Freezing: You can freeze the uncoated, rolled spheres for up to 2 months in an airtight ziplock bag. Thaw them in the refrigerator overnight before inserting the sticks and dipping them. Freezing fully decorated treats is not recommended, as condensation will cause the colored candy shells to bead with water and ruin the decorations when thawing.
Conclusion
This ultimate cake pop recipe guarantees perfectly round, crack-free, and decadent bite-sized treats every time. By mastering the crumb-to-frosting ratio and proper dipping techniques, you elevate simple ingredients into gourmet delights. Try this recipe today, share your results in the comments, and subscribe to our blog for more updates!
Cake pop 7 best recipe tips for a flawless bite
Ingredients
Equipment
Method
Step 1: Prepare and Crumble the Base
Start with a baked dessert that has completely cooled. If it is even slightly warm, your frosting binder will melt, resulting in a greasy paste. Cut the sponge into large quarters and rub the pieces together over a large bowl to create fine, sand-like crumbs. Discard any hard, over-baked crust edges, as these will create lumpy, misshapen spheres. For advice on baking the perfect foundational sponge, see mastering the art of traditional layer cakes.Step 2: Incorporate the Frosting Binder
Add 1/3 cup of your frosting to the fine crumbs. Use your hands to knead the mixture together. You are looking for a play-dough consistency. Squeeze a handful of the mixture; if it holds a solid shape without crumbling apart, it is ready. If it feels dry, add frosting one tablespoon at a time.Actionable Tip: Stop mixing immediately once the dough holds together. Over-saturating the crumbs with frosting will make the spheres too heavy, causing them to slide right off the stick later.Step 3: Portion, Roll, and Chill
Use a small cookie scoop (about 1 tablespoon in volume) to portion the dough. Roll each portion between your palms until perfectly spherical and smooth. Place the spheres on a parchment-lined baking sheet. Chill them in the refrigerator for exactly 2 hours, or in the freezer for 15 to 20 minutes until firm but not frozen solid.Step 4: Secure the Lollipop Sticks
Melt a small handful of your candy melts in a microwave-safe bowl. Remove the chilled spheres from the fridge. Dip the tip of a lollipop stick about half an inch into the melted candy, then gently insert it about halfway into the center of a chilled sphere. Place them back on the baking sheet and chill for another 10 to 15 minutes. This step creates a crucial "glue" that locks the stick to the heavy center.Step 5: Prepare the Dipping Chocolate
Melt the remaining candy wafers in your tall, narrow mug using the microwave on 50% power, stirring vigorously every 30 seconds until silky smooth. If the coating seems too thick, stir in 1 teaspoon of solid vegetable shortening or refined coconut oil to thin it out to a fluid, pourable consistency.Step 6: The Final Dip and Decorate
Take a few spheres out of the fridge at a time. Hold a stick and submerge the entire sphere straight down into the melted coating until it meets the stick. Pull it straight up—do not swirl it in the cup. Hold it over the cup and gently tap your wrist (not the stick itself) to allow the excess chocolate to drip off. While the coating is still wet, immediately apply your sprinkles. Stick the finished treat upright into your styrofoam block to dry completely at room temperature.