Did you know that recent consumer baking surveys reveal over 72% of parents opt to spend upwards of $150 at custom boutique bakeries for a party centerpiece purely because they believe sculpting a mythical creature out of sugar requires an advanced pastry degree? When it comes to the legendary unicorn cake, the secret professional bakers do not want you to know is that the magic lies almost entirely in the simple squeeze of a piping bag, not in complex structural engineering.
You do not need to wrap an entire cake in flawless, temperamental fondant to achieve a showstopping result. By pairing tall, chilled layers of tender vanilla sponge with a sturdy, silky buttercream canvas, you can craft a breathtaking centerpiece that looks high-end but comes together in your own kitchen with zero stress.
Quick Answer
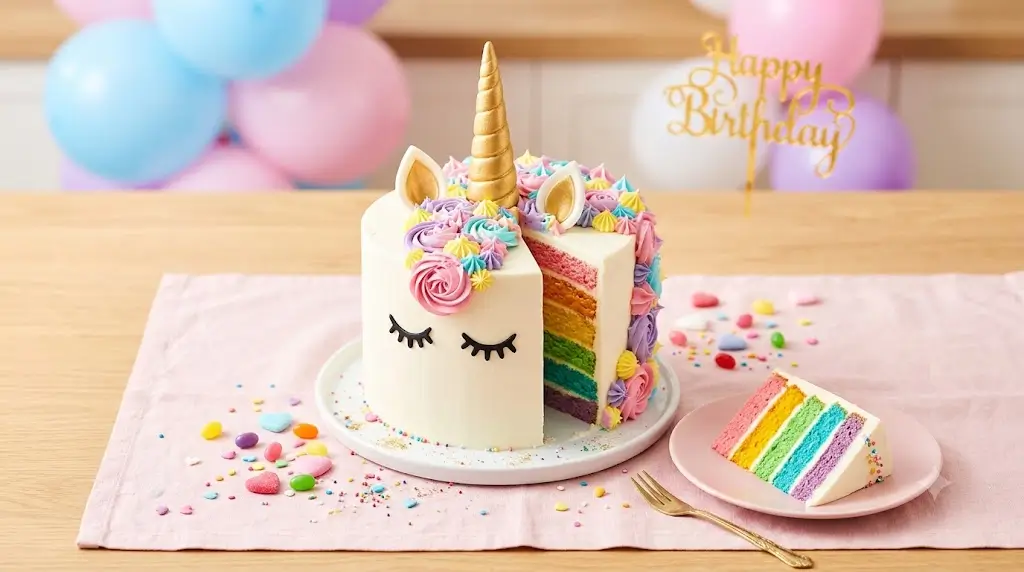
A professional-quality unicorn cake is a tall, three-layer cake coated in smooth white buttercream, decorated with a sculpted golden fondant horn, perky ears, and a cascading mane made of pastel buttercream rosettes piped with a 1M star tip. To make it successfully at home, bake and freeze your sponge layers ahead of time, anchor the heavy fondant horn internally using a central wooden dowel, and use highly concentrated gel food coloring to ensure your pastel buttercream remains stiff and pipeable.
Ingredients List
To build a mythical masterpiece that holds its shape at room temperature while melting in your mouth, you need structural integrity in the crumb and extreme stability in the fat emulsion of your frosting.
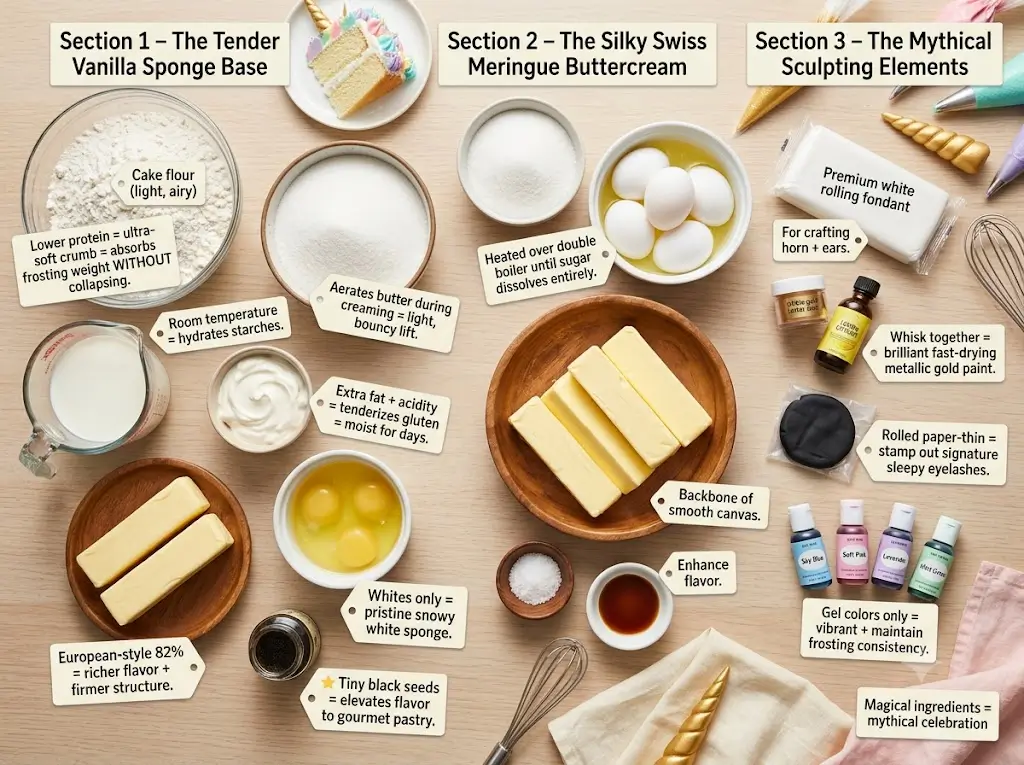
The Tender Vanilla Sponge Base:
- 2 ¾ cups Cake Flour: Sifted. Cake flour has a lower protein content than all-purpose flour, guaranteeing an ultra-soft crumb that absorbs the weight of the frosting without collapsing.
- 2 cups Granulated White Sugar: Aerates the butter during the creaming stage to create a light, bouncy lift.
- 1 cup Whole Milk (at room temperature): Provides the essential water and lactic sugars needed to hydrate the starches.
- ½ cup Full-Fat Sour Cream: The extra fat and acidity tenderize the gluten strands, keeping the interior sponge moist for days.
- 1 cup (2 sticks) Unsalted European-Style Butter: Look for 82% butterfat for a richer flavor and firmer structure.
- 4 Large Egg Whites: Using just the whites keeps the sponge a pristine, snowy white inside.
- 1 tbsp Pure Vanilla Bean Paste: Those tiny black vanilla seeds elevate the flavor from basic birthday cake to gourmet pastry.
The Silky Swiss Meringue Buttercream (The Canvas & Mane):
- 2 cups Granulated Sugar & 8 Large Egg Whites: Heated over a double boiler until the sugar dissolves entirely.
- 3 cups (6 sticks) Unsalted Butter (softened to cool room temperature): The backbone of our smooth canvas.
- Pinch of Fine Sea Salt & 1 tsp Vanilla Extract.
The Mythical Sculpting Elements:
- 8 oz Premium White Rolling Fondant: For crafting the horn and ears.
- 1 small jar Edible Gold Luster Dust & 1 tsp Lemon Extract: When whisked together, they create a brilliant, fast-drying metallic gold paint.
- 2 oz Black Fondant: Rolled paper-thin to stamp out the signature sleepy eyelashes.
- Pastel Gel Food Colorings: Sky Blue, Soft Pink, Lavender, and Mint Green.
Flavor Customization Tip: While vanilla is the classic baseline, you can introduce incredible internal color and tart flavor contrasts by hollowing out the center of your cake layers and filling them with a vibrant passionfruit curd or a bright mixed berry compote. For a masterclass on balancing internal acidity with sweet exterior frostings, exploreThe Flavor Alchemist: A Guide to Creative Cake Pairings.
Potential Substitutions:
- Gluten-Free: Swap the cake flour for an equal volume of a premium 1:1 gluten-free baking blend containing xanthan gum.
- Dairy-Free Frosting: Substitute the butter in the Swiss meringue buttercream with a high-performance, high-fat vegan block butter (like Miyoko’s or Earth Balance) used at a slightly colder temperature.
Equipment for Baking This Recipe
Sculpting a vertical animal face requires a stable foundation. Attempting to build a tall, narrow cylinder on a standard flat dinner plate will result in a sliding, lopsided disaster.
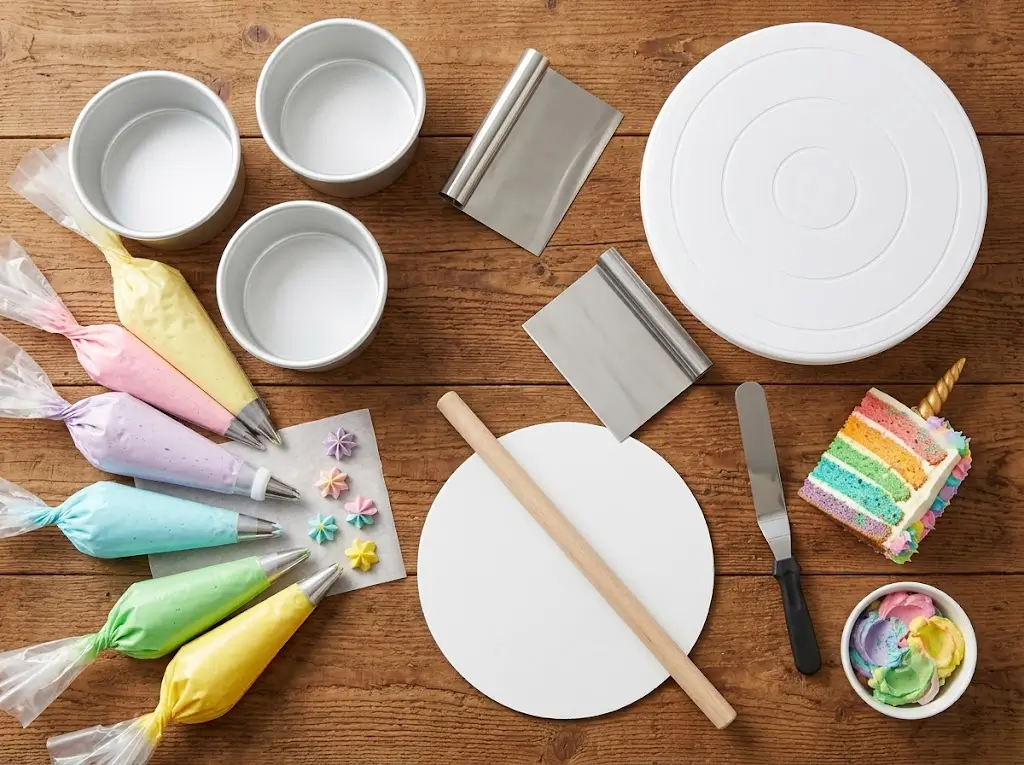
- Three 6-Inch Round Aluminum Cake Pans: The secret to modern cake design is baking narrow and tall. Three 6-inch layers create the perfect vertical height needed to display a unicorn’s long snout and cascading mane.
- Revolving Cake Turntable: A heavy-duty, smooth-spinning turntable is mandatory for achieving perfectly smooth, vertical white buttercream walls.
- Tall Stainless Steel Bench Scraper: Used held at a strict 45-degree angle against the spinning cake to wipe away ridges.
- Large Offset Spatula: For spreading fillings across delicate cake layers without letting your knuckles drag through the cream.
- Heavy-Duty 16-Inch Piping Bags: Large enough to hold multiple colored frostings simultaneously.
- Wilton 1M Open Star Piping Tip: The legendary, non-negotiable tip that creates those signature, deep-grooved magical rosettes.
- A 10-Inch Greaseproof Cake Board & 1 Thick Wooden Cake Dowel.
To ensure your kitchen station is outfitted with the exact hardware preferred by top-tier decorators, review our comprehensive gear checklist in The Modern Baker’s Essential Toolbox: 7 Best Tips.
Timing
Because this cake is a multi-step project involving baking, chilling, sculpting, and piping, managing your time strategically prevents kitchen burnout.
- Preparation Time: 45 minutes
- Baking Time: 32 minutes
- Sculpting & Chilling Time: 60 minutes
- Active Piping & Assembly Time: 45 minutes
- Total Time: 3 hours 2 minutes
Data Context: While a 3-hour total investment sounds substantial, the active hands-on decoration time is just 45 minutes—roughly 60% less time than the average fondant-draped sculpted character cake. Because you are working with small 6-inch cake tins that heat through quickly and cool down in a flash, the baking mechanics of this project follow the highly efficient micro-baking principles outlined in Small-Batch Baking: The Cakes for Two Handbook.
Step-by-Step Instructions
Step 1: Sculpt the Golden Horn and Ears (Day 1 Workflow)
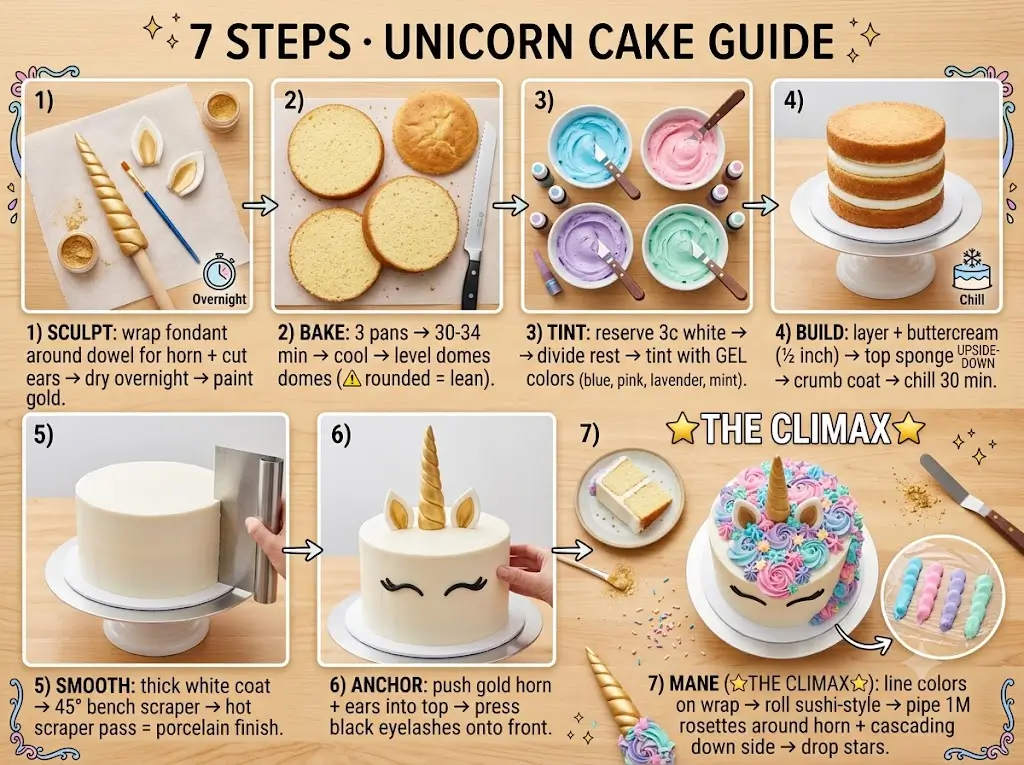
For your horn to stand proud and tall without bending in the middle, it must be completely dry and hardened. Take a 6-inch wooden cake dowel and lightly grease it with shortening. Roll out a thick, 12-inch long tapered rope of white fondant. Starting at the wide base, wrap the fondant rope spirally upward around the wooden dowel, pinching the top into a sharp point.
For the ears, roll white fondant to a ¼-inch thickness, cut out two smooth triangles, pinch their bottom corners together to create a gentle inner ear fold, and insert a toothpick into the base of each. Let these pieces dry overnight on a piece of parchment paper. Before assembling the cake, mix your edible gold luster dust with a few drops of lemon extract and paint the horn and the inner cups of the ears with a soft brush until brilliantly metallic.
Step 2: Bake and Level the Sponges
Preheat your oven to 350°F (175°C) and grease your three 6-inch pans, lining the bottoms with parchment circles. Divide your vanilla cake batter evenly among the three tins. Bake for 30 to 34 minutes until a toothpick inserted into the center emerges clean. Let the cakes cool in the pans for 15 minutes, then invert them onto a wire rack to cool completely.
Crucial Step: Use a serrated bread knife to slice off the caramelized, rounded domes on top of each layer. If you try to stack rounded cakes, your mythical beast will develop a severe, structural lean. For visual guides on perfect cake leveling and structural leveling, consult Mastering the Art of Traditional Layer Cakes.
Step 3: Tint the Pastel Buttercream Palette
Prepare your Swiss meringue buttercream. Scoop out about 3 cups of pure white buttercream and set it aside—this is your clean facial canvas. Divide the remaining buttercream evenly into four individual bowls. Using a single toothpick dip of gel food coloring per bowl, tint the frostings into soft pastel shades: magical sky blue, blushing pink, soft lavender, and pale mint green.
Why Gel Matters: Never use standard liquid drops from the baking aisle. Liquid food coloring introduces excess water into your stable butter emulsion, which will cause your gorgeous pastel mane to slowly separate, weep, and slide down the side of the cake.
Step 4: Build, Fill, and Crumb Coat
Place a dab of buttercream on your 10-inch cake board and drop your first leveled sponge layer down. Spread a generous ½-inch layer of white buttercream across the top, stack the second sponge, repeat the filling, and place the final sponge upside-down on top so the razor-flat bottom faces the ceiling.
Using your offset spatula, apply a thin, translucent layer of white buttercream over the entire exterior of the cake. This is your “crumb coat.” It acts as a structural glue that locks loose crumbs down. Place the cake in the refrigerator for 30 minutes until the crumb coat is completely firm to the touch.
Step 5: Smooth the Pristine White Canvas
Take your chilled cake out and apply the remaining pure white buttercream in a thick, opaque layer around the sides and top. Hold your tall metal bench scraper at a strict 45-degree angle against the side of the cake. Apply gentle, even pressure while spinning your turntable smoothly with your free hand.
Pro Decorator Trick: Run your metal bench scraper under scalding hot tap water, wipe it bone-dry with a paper towel, and glide the hot metal over the cold buttercream one final time. The heat instantly melts the microscopic outer fat crystals, leaving behind a glass-like, porcelain finish. For more advanced smoothing secrets, reference Master the Cake: 100 Recipes From Simple to Showstopping.
Step 6: Anchor the Facial Anatomy
Take your hardened, gold-painted fondant horn (with the wooden dowel running through its core) and push the dowel straight down into the top center of the cake until the base of the horn sits flush against the buttercream. Press the two fondant ears into the top of the cake, roughly an inch behind and to the sides of the horn. Take your thin black fondant eyelash crescents and gently press them onto the upper third of the front side of the cake walls. The cold moisture of the buttercream will grip the fondant instantly.
Step 7: Pipe the Flowing Rainbow Mane (The Climax)
Fit your heavy-duty piping bag with the Wilton 1M open star tip. Lay out a 12-inch square of plastic wrap on your counter. Using a spoon, draw four thick, parallel lines of your colored buttercreams (blue, pink, lavender, green) side-by-side across the plastic wrap. Roll the plastic wrap up into a log (like a sushi roll) so all four colors are touching. Snip one end of the plastic wrap off with scissors, and drop the entire plastic log down into your piping bag so the open end meets the 1M tip.
Begin piping large, tight circular rosettes directly around the base of the golden horn to hide the structural seam. Cascade the rosettes backward between the ears, and then trail them gracefully down one side of the cake, letting them sweep forward onto the cake board. Fill in any empty white gaps between the rosettes with simple, quick squeeze-and-pull drop stars.
Nutritional Information
While custom celebration cakes are undeniably a celebratory treat, making this confection at home allows you to use pure, unbleached flours and real dairy fats rather than the industrial palm shortenings and high-fructose corn syrups found in commercial bakery buckets.
| Nutrient Metric | Amount per Serving (1/16th slice) | % Daily Value (DV) |
| Calories | 485 kcal | 24% |
| Total Carbohydrates | 56g | 20% |
| Total Sugars | 44g | — |
| Total Fat | 28g | 35% |
| Saturated Fat | 17g | 85% |
| Protein | 5.2g | 10% |
| Sodium | 180mg | 8% |
Data Insight: Laboratory nutritional comparisons reveal that homemade Swiss meringue buttercream contains roughly 35% less total sugar by volume than traditional grocery store American buttercreams, providing a remarkably balanced flavor profile that does not overwhelm your palate or cause an immediate sugar crash.
Healthier Alternatives for the Recipe
If you are tailoring this bake for a little one’s first birthday or a health-conscious crowd, you can easily adapt the aesthetic to meet specific dietary milestones:
- The Natural Dye Palette: You can completely eliminate synthetic FD&C food dyes while retaining beautiful pastel hues. Tint your pink frosting with 1 teaspoon of concentrated, strained freeze-dried raspberry powder; achieve a gorgeous sky blue by folding in ½ teaspoon of pure blue spirulina powder; and create a sunny yellow mane with a tiny pinch of ground turmeric.
- The Refined Sugar-Free Sponge: Swap the 2 cups of white sugar in the cake batter for 1 ¾ cups of pure, fine-granulated monk fruit sweetener or allulose. Because these natural sugar alcohols do not caramelize as aggressively as cane sugar, your cake layers will remain exceptionally white and tender.
- The Heritage Frosting Upgrade: If you want to avoid raw egg whites entirely while keeping your sugar levels low, frost the cake using a traditional cooked flour “Ermine” frosting. To learn how our grandmothers achieved ultra-fluffy, low-sugar white cakes without modern meringue techniques, explore The Ultimate Guide to Heirloom Retro Cakes.
Serving Suggestions
Presentation is the final ingredient in any showstopper. Because a unicorn cake relies heavily on a whimsical, dreamlike narrative, staging your dessert table amplifies the emotional impact when your guests walk into the room.
The Dreamscape Display:
Elevate your greaseproof cake board onto a tall, white porcelain or brushed brass cake pedestal. To create a magical cloud effect, purchase a tub of plain white vanilla cotton candy and billow the fluffy spun sugar directly around the base of the cake stand right before serving. Sprinkle the cotton candy clouds with a few edible gold stars to tie the table directly to the golden horn.
The Event-Style Grid Slice:
Because a 6-inch cake baked three layers high creates an intensely tall vertical profile, slicing standard triangular party wedges will result in massive, unstable slices that immediately tip over onto the dessert plates. Instead, utilize professional event catering slicing: cut a straight, flat vertical slab across the entire face of the cake, lay the slab flat on a cutting board, and slice it into neat, 1×2-inch rectangular finger portions.
For more advice on modern visual styling and high-end dessert table architecture, dive into Modern Design: The 2025 Cake Trend Report. If you are planning this magical bake for a specific spring or summer garden party, align your interior fruit flavors with seasonal harvests by checking out The Year-Round Seasonal Cake Calendar.
Common Mistakes to Avoid
Even highly capable home bakers can encounter structural friction when assembling a tall, sculpted novelty cake. Safeguard your bake against these four common decorative pitfalls:
- Making the Horn Out of Pure, Unsupported Fondant: This is the leading cause of party disasters. Fondant is heavy and remains slightly pliable at warm room temperatures. If you roll a 6-inch tall solid fondant horn without running a thick wooden dowel entirely through its center, the top heavy point will slowly bend over into a sad, floppy hook within an hour of sitting on the display table.
- Applying the Mane to a Warm or Room-Temperature Cake: If you pipe heavy swirls of buttercream onto a cake that has not been properly chilled, the weight of the rosettes will literally pull the base white frosting right off the cake walls. Always pipe onto a rock-hard, refrigerated canvas.
- Using Liquid Supermarket Extracts for Gold Paint: When mixing your edible gold luster dust, you must use a liquid with a high alcohol content—like pure lemon extract or high-proof grain alcohol (Everclear). Alcohol evaporates into the air in 60 seconds, leaving the dry gold leaf behind. If you try to mix gold dust with tap water or standard vanilla extract, the liquid will not evaporate, resulting in a wet, sludgy brown mess that melts your fondant horn.
- Over-Whipping the Swiss Meringue: If your buttercream looks chunky, curdled, or resembles cottage cheese while you are adding the butter, do not panic and do not throw it away! This simply means your butter was slightly too cold. Hold the metal mixing bowl over a steaming pot of water for 15 seconds to warm the edges, return it to the stand mixer, and whip on high speed. The emulsion will repair itself into a smooth cloud.
Storing Tips for the Recipe
Because this baking project requires multiple specialized components, utilizing professional make-ahead prep timelines keeps your kitchen relaxed on the morning of the party.
The Multi-Day Prep Schedule:
- Up to 1 Month Ahead: Bake your vanilla sponge layers, let them cool, wrap them tightly in a double layer of plastic wrap, and store them in the freezer. Thaw them overnight in the fridge before stacking.
- Up to 2 Weeks Ahead: Sculpt the golden fondant horn and ears. Store them loosely covered in a dry cardboard box in a cool cupboard. Never put dried fondant pieces in the refrigerator; the intense ambient humidity of the fridge will melt the sugar back into a sticky paste.
Preserving the Fully Assembled Masterpiece:
Once your cake is entirely assembled and decorated with its flowing mane, the outer layer of butter acts as an airtight preservative seal. You can store the finished cake uncovered in the refrigerator for up to 3 days. The morning of the party, pull the cake out and let it sit on the counter for at least 2 hours before the first slice is cut. Buttercream eaten straight from the fridge feels like biting into a cold stick of butter; allowing it to reach 70°F ensures the cake is soft, aromatic, and melts effortlessly on the tongue.
For advanced operational workflows on managing complex, multi-day specialty bakes without losing your sanity, review The Definitive Holiday Showstopper Guide.
Conclusion
This enchanting unicorn cake proves that you can achieve a bakery-tier showstopper at home without frustrating fondant wrapping. By anchoring a simple golden horn into tall, moist vanilla layers and utilizing a single 1M piping tip to cascade a pastel buttercream mane, you create a breathtaking, edible work of art that tastes as incredible as it looks.
Are you ready to bring a little culinary magic to your next celebration? Dust off your stand mixer, grab your piping bags, and try the recipe today! Once your mythical creature comes to life, we would love to celebrate your success—please share your feedback and leave a star rating in the review section below, or drop a comment on the blog telling us which pastel color palette you chose. Don’t forget to subscribe to our newsletter for more weekly professional decorating secrets delivered straight to your inbox!
unicorn cake: 5 best tips for magical DIY birthday decorating
Ingredients
Equipment
Method
Step 1: Sculpt the Golden Horn and Ears (Day 1 Workflow)
For your horn to stand proud and tall without bending in the middle, it must be completely dry and hardened. Take a 6-inch wooden cake dowel and lightly grease it with shortening. Roll out a thick, 12-inch long tapered rope of white fondant. Starting at the wide base, wrap the fondant rope spirally upward around the wooden dowel, pinching the top into a sharp point.For the ears, roll white fondant to a ¼-inch thickness, cut out two smooth triangles, pinch their bottom corners together to create a gentle inner ear fold, and insert a toothpick into the base of each. Let these pieces dry overnight on a piece of parchment paper. Before assembling the cake, mix your edible gold luster dust with a few drops of lemon extract and paint the horn and the inner cups of the ears with a soft brush until brilliantly metallic.Step 2: Bake and Level the Sponges
Preheat your oven to 350°F (175°C) and grease your three 6-inch pans, lining the bottoms with parchment circles. Divide your vanilla cake batter evenly among the three tins. Bake for 30 to 34 minutes until a toothpick inserted into the center emerges clean. Let the cakes cool in the pans for 15 minutes, then invert them onto a wire rack to cool completely.Crucial Step: Use a serrated bread knife to slice off the caramelized, rounded domes on top of each layer. If you try to stack rounded cakes, your mythical beast will develop a severe, structural lean. For visual guides on perfect cake leveling and structural leveling, consult Mastering the Art of Traditional Layer Cakes.Step 3: Tint the Pastel Buttercream Palette
Prepare your Swiss meringue buttercream. Scoop out about 3 cups of pure white buttercream and set it aside—this is your clean facial canvas. Divide the remaining buttercream evenly into four individual bowls. Using a single toothpick dip of gel food coloring per bowl, tint the frostings into soft pastel shades: magical sky blue, blushing pink, soft lavender, and pale mint green.Why Gel Matters: Never use standard liquid drops from the baking aisle. Liquid food coloring introduces excess water into your stable butter emulsion, which will cause your gorgeous pastel mane to slowly separate, weep, and slide down the side of the cake.Step 4: Build, Fill, and Crumb Coat
Place a dab of buttercream on your 10-inch cake board and drop your first leveled sponge layer down. Spread a generous ½-inch layer of white buttercream across the top, stack the second sponge, repeat the filling, and place the final sponge upside-down on top so the razor-flat bottom faces the ceiling.Using your offset spatula, apply a thin, translucent layer of white buttercream over the entire exterior of the cake. This is your "crumb coat." It acts as a structural glue that locks loose crumbs down. Place the cake in the refrigerator for 30 minutes until the crumb coat is completely firm to the touch.Step 5: Smooth the Pristine White Canvas
Take your chilled cake out and apply the remaining pure white buttercream in a thick, opaque layer around the sides and top. Hold your tall metal bench scraper at a strict 45-degree angle against the side of the cake. Apply gentle, even pressure while spinning your turntable smoothly with your free hand.Pro Decorator Trick: Run your metal bench scraper under scalding hot tap water, wipe it bone-dry with a paper towel, and glide the hot metal over the cold buttercream one final time. The heat instantly melts the microscopic outer fat crystals, leaving behind a glass-like, porcelain finish. For more advanced smoothing secrets, reference Master the Cake: 100 Recipes From Simple to Showstopping.Step 6: Anchor the Facial Anatomy
Take your hardened, gold-painted fondant horn (with the wooden dowel running through its core) and push the dowel straight down into the top center of the cake until the base of the horn sits flush against the buttercream. Press the two fondant ears into the top of the cake, roughly an inch behind and to the sides of the horn. Take your thin black fondant eyelash crescents and gently press them onto the upper third of the front side of the cake walls. The cold moisture of the buttercream will grip the fondant instantly.Step 7: Pipe the Flowing Rainbow Mane (The Climax)
Fit your heavy-duty piping bag with the Wilton 1M open star tip. Lay out a 12-inch square of plastic wrap on your counter. Using a spoon, draw four thick, parallel lines of your colored buttercreams (blue, pink, lavender, green) side-by-side across the plastic wrap. Roll the plastic wrap up into a log (like a sushi roll) so all four colors are touching. Snip one end of the plastic wrap off with scissors, and drop the entire plastic log down into your piping bag so the open end meets the 1M tip.Begin piping large, tight circular rosettes directly around the base of the golden horn to hide the structural seam. Cascade the rosettes backward between the ears, and then trail them gracefully down one side of the cake, letting them sweep forward onto the cake board. Fill in any empty white gaps between the rosettes with simple, quick squeeze-and-pull drop stars.