Ingredients
Equipment
Method
Step 1: Sculpt the Golden Horn and Ears (Day 1 Workflow)
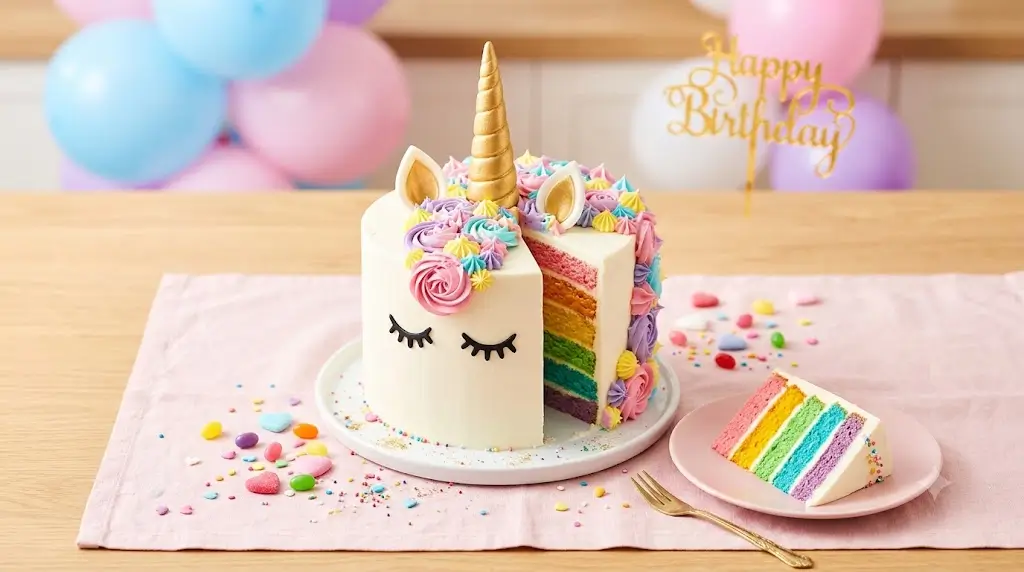
For your horn to stand proud and tall without bending in the middle, it must be completely dry and hardened. Take a 6-inch wooden cake dowel and lightly grease it with shortening. Roll out a thick, 12-inch long tapered rope of white fondant. Starting at the wide base, wrap the fondant rope spirally upward around the wooden dowel, pinching the top into a sharp point.For the ears, roll white fondant to a ¼-inch thickness, cut out two smooth triangles, pinch their bottom corners together to create a gentle inner ear fold, and insert a toothpick into the base of each. Let these pieces dry overnight on a piece of parchment paper. Before assembling the cake, mix your edible gold luster dust with a few drops of lemon extract and paint the horn and the inner cups of the ears with a soft brush until brilliantly metallic.Step 2: Bake and Level the Sponges
Preheat your oven to 350°F (175°C) and grease your three 6-inch pans, lining the bottoms with parchment circles. Divide your vanilla cake batter evenly among the three tins. Bake for 30 to 34 minutes until a toothpick inserted into the center emerges clean. Let the cakes cool in the pans for 15 minutes, then invert them onto a wire rack to cool completely.Crucial Step: Use a serrated bread knife to slice off the caramelized, rounded domes on top of each layer. If you try to stack rounded cakes, your mythical beast will develop a severe, structural lean. For visual guides on perfect cake leveling and structural leveling, consult Mastering the Art of Traditional Layer Cakes.Step 3: Tint the Pastel Buttercream Palette
Prepare your Swiss meringue buttercream. Scoop out about 3 cups of pure white buttercream and set it aside—this is your clean facial canvas. Divide the remaining buttercream evenly into four individual bowls. Using a single toothpick dip of gel food coloring per bowl, tint the frostings into soft pastel shades: magical sky blue, blushing pink, soft lavender, and pale mint green.Why Gel Matters: Never use standard liquid drops from the baking aisle. Liquid food coloring introduces excess water into your stable butter emulsion, which will cause your gorgeous pastel mane to slowly separate, weep, and slide down the side of the cake.Step 4: Build, Fill, and Crumb Coat
Place a dab of buttercream on your 10-inch cake board and drop your first leveled sponge layer down. Spread a generous ½-inch layer of white buttercream across the top, stack the second sponge, repeat the filling, and place the final sponge upside-down on top so the razor-flat bottom faces the ceiling.Using your offset spatula, apply a thin, translucent layer of white buttercream over the entire exterior of the cake. This is your "crumb coat." It acts as a structural glue that locks loose crumbs down. Place the cake in the refrigerator for 30 minutes until the crumb coat is completely firm to the touch.Step 5: Smooth the Pristine White Canvas
Take your chilled cake out and apply the remaining pure white buttercream in a thick, opaque layer around the sides and top. Hold your tall metal bench scraper at a strict 45-degree angle against the side of the cake. Apply gentle, even pressure while spinning your turntable smoothly with your free hand.Pro Decorator Trick: Run your metal bench scraper under scalding hot tap water, wipe it bone-dry with a paper towel, and glide the hot metal over the cold buttercream one final time. The heat instantly melts the microscopic outer fat crystals, leaving behind a glass-like, porcelain finish. For more advanced smoothing secrets, reference Master the Cake: 100 Recipes From Simple to Showstopping.Step 6: Anchor the Facial Anatomy
Take your hardened, gold-painted fondant horn (with the wooden dowel running through its core) and push the dowel straight down into the top center of the cake until the base of the horn sits flush against the buttercream. Press the two fondant ears into the top of the cake, roughly an inch behind and to the sides of the horn. Take your thin black fondant eyelash crescents and gently press them onto the upper third of the front side of the cake walls. The cold moisture of the buttercream will grip the fondant instantly.Step 7: Pipe the Flowing Rainbow Mane (The Climax)
Fit your heavy-duty piping bag with the Wilton 1M open star tip. Lay out a 12-inch square of plastic wrap on your counter. Using a spoon, draw four thick, parallel lines of your colored buttercreams (blue, pink, lavender, green) side-by-side across the plastic wrap. Roll the plastic wrap up into a log (like a sushi roll) so all four colors are touching. Snip one end of the plastic wrap off with scissors, and drop the entire plastic log down into your piping bag so the open end meets the 1M tip.Begin piping large, tight circular rosettes directly around the base of the golden horn to hide the structural seam. Cascade the rosettes backward between the ears, and then trail them gracefully down one side of the cake, letting them sweep forward onto the cake board. Fill in any empty white gaps between the rosettes with simple, quick squeeze-and-pull drop stars.